Transforming your jewelry space can be as simple as giving the walls a fresh coat of paint. Many wonder if acrylic paint can be used effectively on walls, especially in areas dedicated to creativity and inspiration. Not only does acrylic paint offer vibrant colors and quick drying times, but it also provides durability and ease of application, making it a popular choice for DIY enthusiasts.
If you’re looking to enhance the ambiance of your jewelry room while ensuring it feels uniquely yours, understanding how to use acrylic paint can be a game changer. This guide will explore the benefits of using acrylic paint for your walls, addressing potential concerns and providing actionable tips to create a beautiful backdrop for your jewelry collection. Get ready to unleash your artistic flair and create a space that reflects your passion for jewelry!
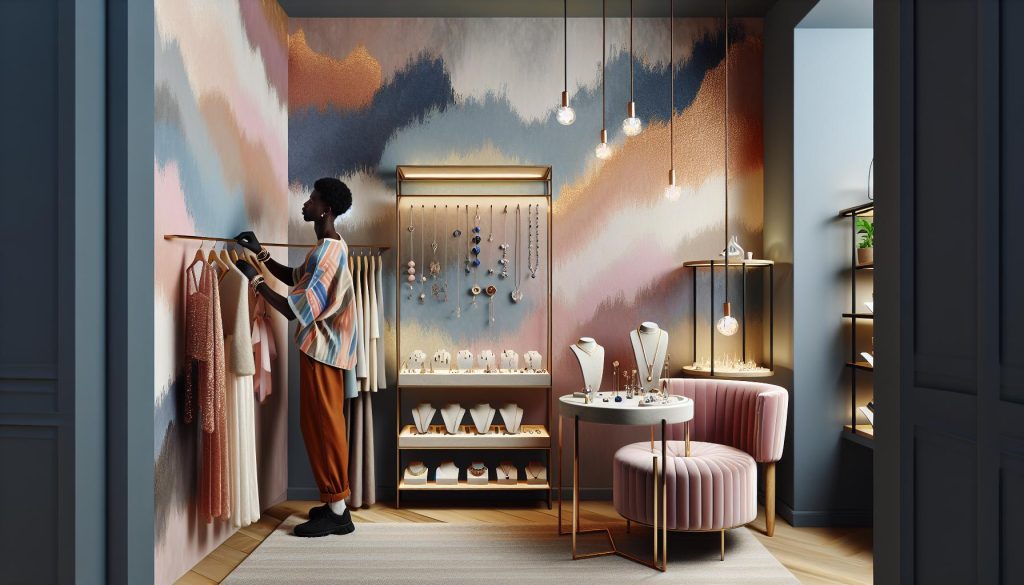
Can You Use Acrylic Paint on Walls for Jewelry Room Makeovers?
Using acrylic paint to transform your jewelry room can yield stunning results, making your space more vibrant and personalized. Acrylic paint is not only versatile but also easy to work with, which is particularly appealing for those looking to refresh their creative spaces. It adheres well to walls, dries quickly, and offers a durable finish that can withstand the unique conditions often found in jewelry-making environments, such as variations in light and humidity.
One of the major benefits of using acrylic paint is its extensive range of colors and finishes, which allows you to create a perfect backdrop for your jewelry collection. Whether you prefer soft pastels to evoke tranquility or bold, bright colors to inspire creativity, acrylics can help you achieve the desired atmosphere. Additionally, acrylic paint is water-based and non-toxic, making it a safe choice for indoor spaces, especially if you spend long hours working on your craft.
To achieve an impressive makeover, consider incorporating techniques like color blocking or ombre effects. These methods can add depth and interest to the walls, creating a unique visual narrative that complements your jewelry display. Moreover, acrylic paint can easily be mixed to create custom shades, ensuring that your jewelry room reflects your personal style and taste. Just remember to prepare your surfaces properly by cleaning and priming your walls, allowing for the best adhesion and longevity of your paint job.
Overview of Using Acrylic Paint for Walls
Using acrylic paint can dramatically alter the aesthetic of your jewelry room, transforming it into a sanctuary that encourages creativity and showcases your collection. With its fast-drying capabilities and wide array of colors, acrylic paint is an ideal medium for those looking to refresh their creative spaces. Its versatility means it can adhere well to different wall surfaces, providing a durable finish that withstands the varying lighting and humidity levels common in environments dedicated to jewelry making.
The appeal of acrylic paint extends beyond its performance; it opens up a realm of possibilities for personalization. From serene pastels that create a calming atmosphere to vivid hues that spark inspiration, the choice of colors can significantly impact the vibe of your jewelry room. As a water-based and non-toxic material, acrylic paint is also a safe alternative for indoor use, especially for those who devote hours to their craft.
Incorporating different painting techniques, such as ombre or color blocking, allows you to add layers of texture and dimension to your walls. This can not only enhance the beauty of your space but could also provide a stunning backdrop for your jewelry displays. Furthermore, mixing acrylic paint lets you create custom colors tailored to your individual style, ensuring your jewelry room is a true reflection of your personality and craft. Preparing the walls adequately-by cleaning and priming-will ensure optimal adhesion of the paint, enhancing the longevity of your makeover. This careful preparation sets the foundation for a transformative project that can refresh both the space and your passion for your craft.
Benefits of Acrylic Paint in Jewelry Rooms
Transforming your jewelry space with acrylic paint offers numerous advantages that elevate both the functionality and aesthetic appeal of the environment. One of the most compelling benefits is the exceptional versatility of acrylic paint, which allows it to adapt to a variety of wall surfaces, from drywall to wood. This adaptability ensures that your chosen hues will provide a robust and long-lasting finish, critical in a room where creativity thrives and treasures are displayed.
Moreover, acrylic paint dries quickly, which is particularly beneficial for those looking to revamp their space with minimal downtime. This quick drying time allows for applying multiple layers or techniques in a single day, helping you achieve the desired look without prolonged delays. Its water-based composition also means a reduced odor, making your workspace more pleasant while you engage in your creative pursuits.
Another significant advantage is the expansive color range available with acrylic paints. Whether you are aiming for soothing pastels to create a tranquil backdrop or vibrant tones that spark energy and creativity, the ability to mix colors allows for personalization unique to your style. This customization not only enhances the visual allure of your jewelry room but also contributes to a setting that inspires your craft. Furthermore, the non-toxic nature of acrylic paint enables peace of mind regarding indoor air quality, especially for those who spend extended periods working on their jewelry designs.
In addition to standard wall colors, incorporating different techniques such as stencils, ombre effects, or color blocking can bring depth and character to the space. These creative applications not only beautify the environment but also serve as a fantastic way to showcase your artistic interests. By creating a bespoke atmosphere tailored to your preferences, acrylic paint transforms your jewelry room into an inspiring sanctuary.
Finally, maintaining painted walls is relatively easy, which is essential for a space dedicated to crafting. Acrylic paints are resilient against wear and can withstand the occasional bumps and scrapes that might occur during your creative processes. Regular cleaning can preserve the vibrancy of the colors, ensuring your space remains a source of inspiration for years to come.
Choosing the Right Acrylic Paint Shades for Your Space
When it comes to transforming your jewelry room, the right shade of acrylic paint can set the tone for creativity and inspiration. Choosing colors that resonate with your personal style and the specific atmosphere you want to create is crucial for making your space not only functional but also a joy to be in. Whether you envision a serene retreat for delicate craftsmanship or a vibrant hub full of energy, the shades you select can significantly impact your mood and productivity.
Start by considering the overall feel you want in your jewelry room. Soft pastels can create a calming environment, perfect for intricate work that requires focus. In contrast, bright and bold colors can invigorate the space, making it ideal for brainstorming and dynamic creativity. It’s often helpful to pull inspiration from your jewelry collection as well; let the colors of your gems and materials guide your palette. For instance, if you work with a lot of turquoise and rose gold, think about incorporating those hues into your walls for a cohesive look.
Color Coordination and Accents
Creating a color scheme can be simplified using the 60-30-10 rule: allocate 60% of your room to a primary color, 30% to a secondary color, and 10% to an accent color. This strategy promotes visual harmony while allowing for a pop of interest. For example, a dusty mint might be your primary wall color, softened by creamy whites in your furniture, and then complemented by a bright coral in your accessories or artwork.
- Primary Color: Set the base with a neutral or pastel tone.
- Secondary Color: Add depth with complementary shades that inspire.
- Accent Color: Use vibrant hues to highlight features or decorations.
Consider how natural light interacts with your chosen shades. Paints can appear differently depending on the lighting in your room, so testing samples on your walls before committing is always a wise step. Additionally, textures matter; using a satin or semi-gloss finish on your acrylic paint can help reflect light, making the space appear brighter and more open.
Ultimately, the key to choosing the right shades lies in envisioning how they’ll complement your jewelry making or displaying. Incorporate colors that make you feel confident and inspired, turning your jewelry room into a sanctuary where creativity flourishes alongside your distinctive pieces.
Preparing Your Walls for Acrylic Paint Application
To achieve a flawless paint job in your jewelry room, proper wall preparation is essential. Start by ensuring that your walls are in good condition; cracks, holes, or uneven surfaces can lead to an unsatisfactory finish and diminish the overall look of your space. Thoroughly inspect each wall and make any necessary repairs. Use spackle to fill in holes and imperfections, and once it dries, sand the area to create a smooth surface. For larger imperfections, consider using joint compound to level out the wall.
Next, give your walls a good cleaning. Dust and grime can prevent the paint from adhering properly, so use a damp cloth or sponge to wipe them down. For kitchens or other areas where grease might be present, a mild detergent can be effective. After cleaning, let the walls dry completely before moving on to the next step.
Priming is a critical yet often overlooked aspect of wall preparation. If you’re painting over a darker color or a glossy finish, using a primer will help the new acrylic paint adhere better and ensure even color coverage. Choose a primer that is compatible with acrylic paint for optimal results. Apply the primer using a roller for larger areas and a brush for corners and edges. Once applied, allow adequate drying time as indicated on the product instructions.
Finally, be mindful of the surrounding space before you start painting. Remove or cover furniture, light fixtures, and any art pieces that could get paint splatters. Use painter’s tape to mask off edges around trim and windows, creating crisp lines that will enhance the professional appearance of your finished walls. By taking the time to properly prepare your walls, you’ll ensure a beautiful and enduring result that complements your jewelry-making endeavors beautifully.
Step-by-Step Guide to Painting Walls with Acrylic
Transforming your jewelry room with a fresh coat of acrylic paint can truly elevate the space, making it both visually appealing and inspiring for your creative endeavors. Whether you’re aiming for a serene pastel backdrop or a vibrant statement wall, painting with acrylic can help reflect your style and personality. Here’s a straightforward approach to getting those walls primed and perfectly painted for your jewelry sanctuary.
Begin by gathering all your materials: high-quality acrylic paint, brushes, rollers, painter’s tape, and drop cloths to protect your floor and furniture. Always start with a well-planned strategy. First, use painter’s tape to mask off any areas you don’t want to paint, such as trim, windows, and door frames. Ensure the tape seals well to prevent paint from seeping underneath.
Next, pour your acrylic paint into a tray. Use a roller for larger wall sections, applying a consistent amount without overloading the roller-this helps to avoid dripping. Start at the edges with a brush to ensure smooth coverage, then transition to the roller for the broader areas. Consider working from top to bottom so you can easily catch any drips or runs as you go. If the first coat appears streaky, don’t be discouraged; let it dry completely before applying a second coat for a rich, uniform finish.
For those creative souls looking to add personal touches, consider integrating stencils or sponging techniques with different shades of acrylic paint, adding depth and personality to your walls. Experiment with techniques like ombre or color blocking to create a unique, dynamic environment that not only showcases your jewelry but also inspires your creativity.
Finally, remember that patience leads to perfection. Allow the paint to cure fully before reintroducing furniture and décor into the space, ensuring everything looks professional and polished. With thoughtful planning and execution, your newly painted jewelry room will be a delightful reflection of your creative spirit and a perfect haven for crafting and displaying your beautiful pieces.
Best Techniques for a Professional Finish
Achieving a professional finish when using acrylic paint to transform your jewelry room is all about the right techniques and a bit of finesse. One of the key secrets to a flawless look is selecting the proper tools. Investing in high-quality brushes and rollers will significantly impact your outcomes. For detailed areas, such as corners or trim, use a tapered brush, which allows for precision and control. A short nap roller is ideal for smooth, flat walls, as it minimizes the chances of texture inconsistencies.
Preparation is paramount. Before applying any paint, ensure that your walls are clean and dry. Dust and grease can prevent proper adhesion, leading to an uneven finish. A quick wipe with a damp cloth followed by a light sanding of glossy surfaces will help create a suitable base for the acrylic. Once your surface is prepped, a quality primer-especially for bold colors or porous surfaces-will enhance the vibrancy and longevity of your paint.
When it’s time to paint, consider working in sections to maintain a wet edge. This technique prevents paint lines and allows for seamless blending. Moreover, always apply paint in thin, even coats-thicker layers are prone to drip and can take longer to dry. Allow the first coat to dry completely before assessing coverage; a second coat is often necessary to achieve the depth of color desired. If a textured or patterned effect is what you seek, experiment with sponges or brushes to create artistic flair, but be sure to practice on a separate surface first to avoid any surprises on your walls.
Lastly, once your masterpiece is complete, give it the respect it deserves during the drying and curing process. Avoid putting any heavy items back on the walls for a week, if possible, to ensure the paint fully cures. Failure to do so can lead to smudging or damage-defeating the labor you’ve put into achieving a stunning space. By using these techniques, you create an environment that not only beautifully complements your jewelry but also inspires creativity and passion every time you step into your jewelry room.
Common Mistakes to Avoid When Using Acrylic Paint
When embarking on a transformative journey to revamp your jewelry room with acrylic paint, it’s essential to be aware of common pitfalls that can undermine your efforts. One of the most frequent mistakes homeowners make is skipping the primer. Neglecting this step can lead to uneven color application and reduced durability, especially if your walls are porous or if you’re switching to a bold hue. A quality primer not only improves paint adhesion but also enhances the vibrancy of the topcoat, ensuring your room looks polished and professional.
Another common error is using the wrong tools for the job. While it may be tempting to compromise on brush and roller quality, this can lead to a host of issues, including streaks and an uneven finish. Always opt for high-quality, purpose-specific tools. For instance, using a short nap roller on flat walls minimizes texture inconsistencies, and a tapered brush helps navigate corners and edges effectively. Additionally, remember that applying too thick a coat can cause drips and an elongated drying time; it’s better to build up coverage gradually with multiple thin layers.
Working in poorly lit conditions or ignoring the surrounding environment can also result in unintentional blunders. Ensure your workspace is well-lit for accurate color assessment and to spot any areas that need additional attention. Likewise, failing to protect your furniture or flooring can lead to messy overspill; always use drop cloths or plastic sheeting to catch any accidental drips before they can set in.
Lastly, impatience often trips up DIY enthusiasts. Rushing the drying process or failing to allow sufficient curing time can damage your freshly painted walls. After painting, avoid hanging heavy items or rearranging your jewelry displays until the paint has fully cured-a crucial step to maintain the beauty of your new space. By being mindful of these common mistakes, you can elevate your jewelry room makeover, ensuring an inspiring and light-filled area that reflects your creative spirit.
Creative Ways to Use Acrylic Paint in Jewelry Rooms
Transforming your jewelry room with acrylic paint isn’t just about color-it’s a canvas for creativity that can breathe life into your space. One of the most exciting ways to use acrylic paint is through artistic wall murals. Consider creating a city skyline or nature scene that complements your jewelry collection; this immersive backdrop will not only enhance your room’s character but also provide stunning visual interest that captivates anyone who enters.
Another innovative approach is utilizing different color blocks or geometric shapes on the walls. This technique can frame areas where you display your jewelry, adding an artistic touch while also creating a visually engaging layout. Select vibrant shades that evoke the qualities of your jewelry-think deep blues for sapphires or bright yellows for citrine-and mix them to establish an inspiring palette that reflects your personal style.
DIY Accent Walls with Stencils
Using stencils can take your acrylic painting project to the next level. Choose intricate designs or patterns that resonate with your jewelry aesthetic, such as floral motifs or abstract shapes, and apply them using a contrasting color. This method adds depth and texture to your walls, effectively transforming them into a piece of art themselves.
Don’t forget about furniture and accessories! Acrylic paint can also be employed to revitalize old displays, trays, or organizers where you store your jewelry. A fresh coat of paint in a glossy finish can turn mundane pieces into striking solutions that enhance both function and style. For instance, painting the inside of a jewelry box in a color that pops against the exterior can create a delightful surprise each time you open it.
For those who love a bit of sparkle, mixing acrylic paints with a touch of metallic or glitter finish can elevate your decor. This technique will catch the light and complement any glittering gems you showcase, making your entire room sparkle just as brilliantly as your jewelry.
With these creative techniques, your jewelry room will not only be a functional space but also a vibrant representation of your artistic essence. Embrace the full potential of acrylic paint, and let your walls tell the story of your jewelry collection, making every glance a source of inspiration.
Maintaining Painted Walls in a Jewelry Setup
To keep your artistic vision alive, it’s crucial to maintain those beautifully painted walls in your jewelry room. Acrylic paint, while vibrant and versatile, does require some special care to withstand the daily hustle and bustle of your creative space. The key is to strike a balance between preserving the aesthetic and managing practicality.
Start by regularly dusting the walls with a soft, dry cloth or a microfiber duster. This simple step prevents dirt and grime from settling into the paint and maintains the brightness of your selected colors. If you encounter smudges or fingerprints, use a damp cloth with mild soap to gently wipe the area, but always test in an inconspicuous spot first to ensure the color doesn’t blur or fade. Avoid abrasive cleaners or sponges, as they can damage the paint surface.
For areas prone to moisture, such as around your jewelry-making station or near windows, consider applying a protective sealant over the acrylic paint. This extra layer can help with moisture resistance and make cleaning easier. Additionally, think about using washable acrylic paints, which tend to stand up better against scrubbing and can be wiped down without color loss.
Lastly, incorporate your walls into your overall jewelry room theme. Consider changing decor seasonally or adding new accents that complement the paint, which can rejuvenate the space without needing a full repaint. These small adjustments not only enhance the room’s aesthetic but also remind you to check in on the wall maintenance regularly.
By following these simple yet effective tips, you can ensure that your painted walls remain a beautiful backdrop for showcasing your treasured pieces, allowing your jewelry collection to shine in a well-maintained environment.
Decorative Techniques: Stencils and Patterns with Acrylic Paint
Transforming your jewelry room into a visually captivating space can be as simple as adding decorative stencils and patterns with acrylic paint. This versatile medium not only dries quickly but also adheres beautifully to walls, making it perfect for creating stunning designs that reflect your personal style. Using stencils allows you to introduce intricate patterns without the need for advanced painting skills, empowering even beginners to craft an elegant ambiance that enhances your jewelry collection.
To get started, choose stencil designs that resonate with the overall theme of your jewelry room. For a delicate and whimsical feel, floral patterns or lace designs may be ideal, while geometric shapes can add a modern touch. Begin by selecting a complementary color palette that enhances your existing decor-soft pastels bring a serene vibe, while vibrant hues can energize the space. Once you have your stencils and paint ready, ensure that your walls are clean and primed; this will help achieve a smooth finish.
Step-by-Step Application
- Prepare your area: Lay down drop cloths to protect your floors and surrounding furniture.
- Position the stencil: Use painter’s tape to secure the stencil in place. Make sure it’s level to create an even pattern.
- Apply the paint: Use a foam roller or stencil brush to apply acrylic paint lightly over the stencil. Remove excess paint before applying to avoid drips.
- Remove the stencil: Carefully lift the stencil away while the paint is still wet for clean edges.
Once your pattern is in place, consider layering with another design or incorporating a few accent colors to create a dynamic look. This kind of creative depth can make your jewelry room feel expansive and thoughtfully curated, serving as a perfect backdrop for showcasing your treasured pieces.
Using acrylic paint doesn’t just stop at walls; think about extending your design elements by painting decorative frames for mirrors or storage boxes that house your jewelry. By integrating stenciled elements throughout the room, you maintain a cohesive design that elevates the feel and functionality of your space. Embrace this artistic approach and let your walls do the talking as they beautifully complement your jewelry collection.
Incorporating DIY Wall Art into Your Jewelry Space
Integrating DIY wall art into your jewelry space can truly transform the ambiance, adding a unique flair that showcases both your personal style and your collection. A well-crafted piece of wall art not only allows you to express your creativity, but also enhances the overall aesthetic of the room, serving as an eye-catching backdrop for your jewelry displays. One fantastic aspect of acrylic paint is its versatility-it’s easy to work with, dries quickly, and can be manipulated to create a range of textures and finishes.
Begin by selecting canvas frames or wooden panels as your canvas for wall art. These materials offer a solid base for your designs and can be easily hung to complement the walls of your jewelry room. You can experiment with various techniques-such as pouring, splattering, or using brushes to create depth and dimension. Consider using a color palette that harmonizes with the hues in your jewelry pieces; for instance, if you have an array of turquoise jewelry, incorporating shades of blue and green into your wall art can create a cohesive look.
Incorporating Jewelry Themes
Add a personal touch by incorporating jewelry-related themes into your DIY art. You can use acrylic paint to depict silhouettes or abstract forms of jewelry pieces-think of delicate earrings or a graceful necklace. Alternatively, create a mural or a large statement piece that features inspiring quotes about jewelry, such as “Jewelry is a way of keeping memories alive.” This adds not only visual interest but emotional resonance to your space.
Maintenance and Transformation
Once your wall art is completed and mounted, consider the maintenance of both the art and the painted walls. Ensure that the space is kept clean and free from moisture that could damage your creations. For added creativity, you can easily change your art seasonally. By swapping out pieces or colors, you can refresh the look of your jewelry room in a matter of moments, keeping the space dynamic and in tune with your evolving tastes.
By utilizing these strategies, your jewelry room can become more than just a display area-it can be a personalized sanctuary that celebrates your passion for jewelry while also serving as a beautiful canvas for artistic expression.
Maximizing Light and Color in Your Jewelry Room Design
To create a vibrant and inviting jewelry room, maximizing light and color is essential. Light, whether natural or artificial, plays a crucial role in showcasing your jewelry collection, enhancing its brilliance while influencing the overall ambiance of the space. Additionally, the right color choices can create a warmth that draws attention to your treasures, making them pop against the backdrop of your walls.
Use Reflective Surfaces
Incorporating reflective elements can significantly boost the light levels in your jewelry room. Choose materials such as mirrors, glossy paint finishes, or metallic accents that can bounce light around the space. A well-placed mirror can not only make the room feel larger but also reflect your beautiful jewelry, adding depth and intrigue. Consider using acrylic paint with a satin or semi-gloss finish on the walls-this will not only provide a beautifully smooth surface but will also reflect more light than matte finishes.
Color Palette Considerations
When selecting colors for your walls, aim for shades that complement your jewelry collection. Soft neutrals like cream, light gray, or pale pastels can create an airy atmosphere that allows your jewelry to take center stage. Conversely, deeper shades like rich burgundy or navy can offer a dramatic backdrop but should be balanced with plenty of light elements to prevent the space from feeling dark. You might also consider using an accent wall painted in a bold color to add personality while using lighter colors for the remaining walls to keep the room bright and inviting.
Layer Lighting Strategically
Layering lighting is another effective strategy. Utilize various light sources such as ceiling fixtures, wall sconces, and table lamps to create a well-lit environment. Consider incorporating LED strip lights in display cases or underneath shelves to highlight your jewelry. Dimmer switches can add versatility, allowing you to adjust the mood of the room depending on the time of day or occasion. Warm light bulbs can give a cozy touch, whereas cooler tones can provide a contemporary vibe-be intentional in your choices to harmonize with the style of your jewelry.
By thoughtfully combining light and color, your jewelry room can become not only a functional space for displaying your collection but also an artistic haven that reflects your personal style. This careful consideration will ensure that your jewelry shines in its best light, captivating anyone who enters the room.
Faq
Q: Can you use acrylic paint on all wall surfaces in a jewelry room?
A: Yes, acrylic paint is versatile and can be used on various wall surfaces, including drywall, plaster, and wood. Ensure the surface is clean and primed if necessary, to achieve the best finish. For detailed preparation tips, refer to the “Preparing Your Walls for Acrylic Paint Application” section.
Q: How long does it take for acrylic paint to dry on walls?
A: Acrylic paint typically dries to the touch within 1-2 hours and can be fully cured in 24 hours. For specific drying conditions or considerations, check your environment’s temperature and humidity levels.
Q: Is it necessary to use a sealer after painting walls with acrylic paint?
A: While not always necessary, applying a sealer can enhance durability and washability, especially in high-traffic areas like a jewelry room. Consider this step for long-lasting results.
Q: What tools are best for applying acrylic paint on walls?
A: For optimal results, use a high-quality roller for large areas and a brush for edges and detailed work. A paint sprayer can also be considered for an even finish.
Q: Can you mix acrylic paint colors to create custom shades for your jewelry room?
A: Absolutely! Mixing acrylic paints allows you to create custom colors that match your vision. Test combinations on a small surface before full application to ensure the desired outcome.
Q: What are the best color schemes for a jewelry room using acrylic paint?
A: Bright pastels or neutral tones can create a calming backdrop, allowing jewelry colors to pop. Explore color palettes that enhance your collection’s vibrancy; refer to the “Choosing the Right Acrylic Paint Shades for Your Space” section for more guidance.
Q: How do you fix mistakes made while painting walls with acrylic paint?
A: If you make a mistake, allow the paint to dry, then lightly sand the area and repaint it. For larger errors, it may be necessary to apply a primer before repainting.
Q: Can acrylic paint affect the lighting in a jewelry room?
A: Yes, the finish and color of acrylic paint can influence how light interacts in the room. Lighter colors tend to reflect light, enhancing brightness, while darker shades can create a cozy feel. Explore “Maximizing Light and Color in Your Jewelry Room Design” for more insights.
Closing Remarks
Transforming your jewelry room with acrylic paint can breathe new life into the space, making it not only visually appealing but also a reflection of your unique style. As you embark on this project, remember that using the right type of acrylic paint ensures durability and vibrancy, ideal for showcasing your precious pieces. If you’re ready to take the leap, start planning your colors and techniques today!
Don’t stop here-explore our DIY tutorials for more creative ideas on transforming your space, or check out our essential guides on jewelry care to keep your collection sparkling like new. If you have any questions or need advice, we’d love to hear from you in the comments below! Sign up for our newsletter for the latest tips and inspiration, and keep creating boldly! Your perfect jewelry room awaits!