Acrylic paint can breathe new life into wood jewelry boxes, adding a personal touch to your cherished items. However, accidents happen, and paint spills or unwanted marks can detract from their beauty. Learning how to effectively remove acrylic paint from wood is essential not only for maintaining the aesthetic appeal of your jewelry boxes but also for protecting the underlying wood. In this guide, you’ll discover simple and effective techniques that empower you to restore your items without damaging them. Whether you’re a beginner or an experienced crafter, mastering this skill enhances your ability to care for and personalize your jewelry storage solutions, ensuring they remain just as beautiful as the treasures they hold. Let’s delve into practical solutions that bring your wood jewelry boxes back to life!
How Acrylic Paint Affects Wood Jewelry Boxes
Acrylic paint is a popular choice for crafting due to its vibrant colors and fast-drying properties, but when it inadvertently lands on your cherished wood jewelry box, it can pose some significant challenges. The water-based nature of acrylic paint means that it can seep into the wood’s grain, potentially leading to discoloration or damage if not addressed quickly. This is especially true for porous woods, which absorb moisture more readily, making it crucial to act swiftly to mitigate any adverse effects.
When acrylic paint dries, it forms a water-resistant layer, making it particularly difficult to remove once set. As it hardens, the paint’s bond with the wood can also alter the texture, leading to unsightly surfaces that detract from the jewelry box’s overall aesthetics. Additionally, if the paint is left untreated for extended periods, it can lead to permanent staining or even encourage the wood to swell or warp, compromising the box’s structural integrity.
To protect your jewelry box from the adverse effects of acrylic paint, it’s essential to use preventive measures. Regularly inspect your workspace for any potential spills and try to minimize exposure by employing coverings or protective mats. Should an accident occur, addressing it promptly with the correct techniques will help restore your jewelry box while preserving its original beauty and function. Always remember that the finish on your wood jewelry box can influence how paint interacts with the surface, so selecting appropriate cleaning methods for the specific type of wood and finish is critical.
Essential Supplies for Safe Paint Removal

When it comes to removing acrylic paint from wood jewelry boxes, having the right tools and supplies is crucial to ensure a safe and effective process. Using improper materials can not only fail to remove the paint but may also damage the beautiful finish of your jewelry box. Below is a curated list of essential items you’ll need, along with helpful tips to guide you through the process with confidence.
- Rubbing Alcohol or Acetone: These solvents are effective in dissolving acrylic paint. Rubbing alcohol is gentler and ideal for delicate finishes, whereas acetone can tackle tougher stains.
- Soft Cloths or Sponges: Use lint-free cloths or non-abrasive sponges to apply solvents, ensuring you don’t scratch the wood surface.
- Plastic Scraper or Old Credit Card: A plastic scraper is great for gently lifting paint without gouging the wood.
- Fine-grit Sandpaper: If paint persists, fine-grit (220 to 320) sandpaper can be used cautiously to blend the area without affecting the jewelry box’s overall finish.
- Water and Mild Soap: After paint removal, wash the area with a mild soap and water solution to eliminate any chemical residue.
- Protective Gloves: Always wear gloves to protect your hands from chemicals and paint residues, especially when using acetone or rubbing alcohol.
- Drop Cloth: Protect your work surface with a drop cloth or newspaper to catch any paint drips during the process.
Using these supplies not only simplifies the paint removal process but also helps ensure that your jewelry box retains its charm and integrity. Each item plays a vital role, from the solvents that break down the paint to the protective measures that keep your box safe. Consider testing any solvent on a small, inconspicuous area first to gauge its effect on your jewelry box’s finish. This approach will give you peace of mind as you work to restore your cherished piece.
Step-by-Step Guide to Removing Acrylic Paint

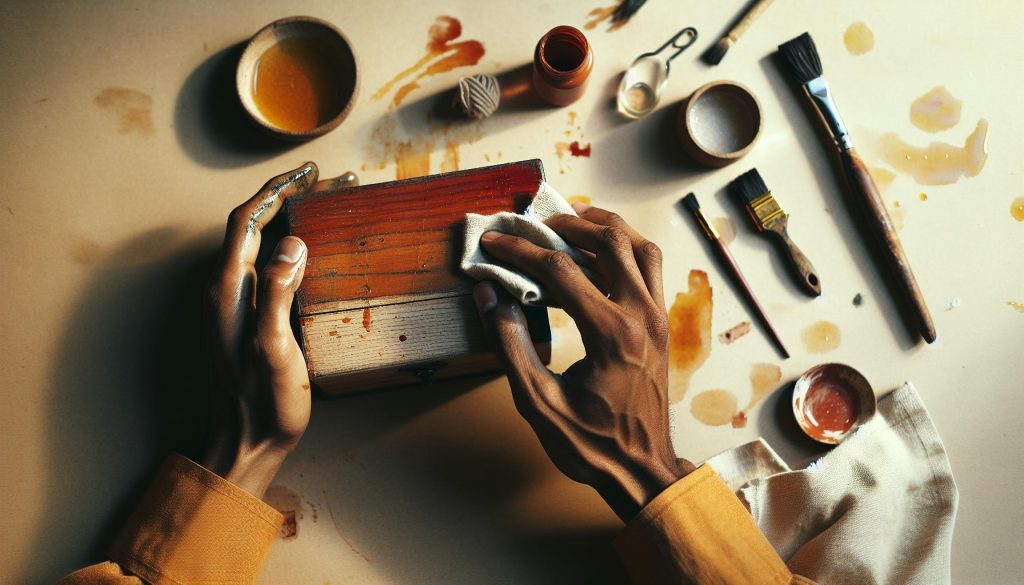
To effectively remove acrylic paint from your wood jewelry box, it’s essential to approach the task with care and the right techniques. Follow this step-by-step guide to ensure your piece retains its beauty while removing unwanted paint.
Begin by preparing your workspace. Lay down a drop cloth to protect the surrounding area, ensuring any drips or spills don’t cause additional mess. Start by assessing the paint-determine if it is still wet or has dried. For fresh paint, immediately dab it with a soft cloth or sponge dampened with water to lift as much as possible. Avoid rubbing, as this might spread the stain further.
If the paint is dried, reach for rubbing alcohol or acetone, depending on the wood finish’s sensitivity. Dampen a clean cloth with your chosen solvent and gently blot the paint stain. It’s crucial to work in a well-ventilated area, especially when using acetone, to avoid inhaling fumes. For stubborn areas, you can use a plastic scraper or an old credit card to gently lift the paint. Be cautious not to gouge the wood.
In instances where the paint clings tenaciously, consider using fine-grit sandpaper (220 to 320 grit) as a last resort. Lightly sand the paint and the surrounding area, blending it with the rest of the finish. Always test this method on a small, inconspicuous area first to ensure it does not damage the surface. Once the paint is removed, clean the area with a mild soapy water solution to eliminate any residue, and allow the jewelry box to dry completely before applying any polish or protective finish.
By following these steps, you can restore your wood jewelry box while preserving its lovely appeal-it’s a task that connects you to your treasures, ensuring they remain a cherished part of your life for years to come.
Effective Techniques for Stubborn Paint Residue
Removing stubborn acrylic paint residue from your wood jewelry box can feel like a daunting task, but with the right techniques, it’s entirely manageable. One effective approach involves using gentle solvents such as rubbing alcohol or acetone. After identifying the appropriate solvent for your jewelry box’s finish, dampen a soft cloth with the solution and gently dab the stained area. This method helps to loosen the paint without damaging the wood. Always perform a test on a hidden spot first to ensure compatibility with the wood’s finish.
When the paint has partially lifted but still remains stubborn, consider the application of heat. A hairdryer set on low can soften the paint residue, making it easier to scrape away. Hold the dryer several inches away from the surface to avoid overheating and potentially damaging the wood. Once the paint becomes pliable, use a plastic scraper or an old credit card to gently peel it off. This scrapping technique minimizes the risk of scratching the wood surface compared to metal tools.
If you’re still faced with persistent spots, it might be time to adopt a more abrasive method. Fine-grit sandpaper (around 220 to 320 grit) can be a last resort for treating stubborn remnants. Lightly sand the affected area, using a circular motion, to remove the paint while blending the surface seamlessly. Remember to frequently check your progress to avoid over-sanding. After you’ve successfully removed the residue, clean the area with a mild soapy water solution to eliminate any remaining solvent or dust, and allow it to dry completely before applying any protective finish or polish.
Ultimately, patience and a gentle touch are key when tackling stubborn acrylic paint. With these techniques, your jewelry box can regain its beautiful appearance while maintaining its sentimental value, ensuring it continues to be a cherished piece for years to come.
Natural Solutions to Remove Paint Safely
Removing acrylic paint from wood jewelry boxes doesn’t always require harsh chemicals. Instead, several natural solutions can effectively lift the paint while preserving the beauty and integrity of the wood. These eco-friendly methods not only safeguard your jewelry box’s finish but also contribute to a safer cleaning process.
Vinegar is a versatile household staple known for its cleaning properties. To use this natural solvent, simply heat a small amount of white vinegar in a microwave until warm (but not boiling). Dampen a soft cloth with the warm vinegar and gently rub the paint-stained area. The acidity in the vinegar helps to break down the paint, making it easier to lift without damaging the wood.
Olive oil is another excellent option, particularly for those who prefer a gentle approach. Mix equal parts of olive oil and lemon juice to create a natural paint remover. Apply the mixture to the affected area with a soft cloth and allow it to sit for a few minutes before gently rubbing. Olive oil nourishes the wood while the lemon juice acts as a mild cleaner, making this method both effective and protective.
Baking soda is yet another natural alternative, particularly useful for tougher spots. Create a paste by mixing baking soda with water and apply it to the paint residues. Let the paste sit for about 10-15 minutes to allow it to penetrate the paint. Afterward, gently scrub the area with a soft-bristled brush or cloth. This method is abrasive enough to lift the paint while remaining gentle on the wood.
When using these natural solutions, remember to always conduct a patch test on an inconspicuous area of the jewelry box before full application. This practice ensures that the wood’s finish will not react adversely to your chosen cleaning method. By adopting these safer techniques, you can effectively maintain your jewelry box’s beauty while ensuring its longevity.
Protecting Your Jewelry Box’s Finish During Cleaning
To keep your wood jewelry box looking beautiful while removing acrylic paint, it’s crucial to focus on techniques that safeguard its finish. Given that wood is a sensitive material, the method you choose can either enhance the wood’s visual appeal or potentially damage it. The first step is to assess the type of finish applied to the jewelry box-whether it’s varnished, lacquered, or oil-based-because different finishes react differently to various cleaners.
Utilizing gentle natural solutions not only minimizes the risk of damaging the wood but also preserves its inherent qualities. For instance, heating a small amount of white vinegar before application can help prevent damage; the warmth allows the vinegar to work more effectively while reducing the need for vigorous scrubbing. Always apply the solution with a soft, non-abrasive cloth, using gentle circular motions to lift the paint without compromising the finish.
Another key strategy is to limit exposure time to any cleaning agents. When using natural remedies like an olive oil and lemon juice mix, allow it to dwell for just a few minutes to soften the paint before wiping it off. This approach is less abrasive and ensures that the box remains nourished rather than stripped of its finish. A patch test on a hidden area can also be invaluable-this step helps verify compatibility with your specific wood finish.
Importantly, after any cleaning process, it’s advisable to restore moisture to the wood. A light application of furniture polish or a mixture of beeswax and mineral oil can help rejuvenate the wood’s surface, enhancing its shine and providing a protective barrier against future mishaps. By following these steps, you can confidently clean your jewelry box, ensuring it remains a cherished part of your collection for years to come.
Preventing Future Paint Accumulation on Wood
To keep acrylic paint from accumulating on your wood jewelry box, a proactive approach is essential. Understanding the factors that contribute to paint buildup can help you maintain your box’s beauty and functionality. One simple solution is to establish a dedicated painting area. Setting up a specific space, whether it’s a table covered in drop cloths or an outdoor area, minimizes the risk of paint splatters finding their way onto your beloved jewelry box. By creating a designated workspace, you also create a habit of cleanup, reinforcing the discipline to manage messes effectively.
Additionally, consider protective coatings for your jewelry box. Applying a thin layer of furniture polish, beeswax, or a clear sealant can create a barrier against paint and other potentially harmful substances. This not only helps to repel paint but also nourishes the wood and enhances its shine. Regular re-application of these protective layers ensures ongoing defense against everyday wear and tear.
Another preventive measure is to maintain an organized storage system for your art materials. Storing paint, brushes, and other supplies in closed containers can significantly reduce the likelihood of accidental spills. When you finish using your materials, clean brushes immediately and store leftover paint securely to prevent mishaps.
Finally, always supervise your painting projects, especially in shared spaces. Keeping an eye on younger creators and encouraging them to follow the guidelines can reduce accidents and prevent future paint issues. By integrating these habits into your routine, you ensure your jewelry box remains pristine and cherished for years to come.
Creative Ways to Restore Your Wood Jewelry Box
Restoring your wood jewelry box after an unfortunate encounter with acrylic paint can breathe new life into this cherished item and bring back its original beauty. With a blend of creativity and practical techniques, you can transform your box into a stunning piece once again.
One effective way to begin restoration is by applying a gentle paint remover specifically formulated for wood. Using a soft cloth, gently rub the affected areas to lift the paint without harming the wood underneath. Always follow up with sanding using fine-grit sandpaper (220 grit) to smooth any rough spots and prepare the surface for finishing. This can be complemented by a careful application of wood stain or paint, which can help match or enhance the original hue of your jewelry box. A synthetic brush will ensure clean lines and even coverage.
Another idea is to decoupage over the paint stains with decorative paper or fabric. This not only conceals the imperfections but also adds a personalized touch to your jewelry box. Use a decoupage medium to adhere your chosen material, smoothing out air bubbles as you go. Finish with a layer of varnish or sealant for durability, which will also create a beautiful gloss over the new design.
Adding new hardware like knobs or handles can also refresh the look of your jewelry box, providing both functionality and style. Choose finishes that complement the wood or the new design elements you’ve introduced, such as vintage brass for a classic look or sleek chrome for a modern aesthetic. These small upgrades can make a significant difference in the overall appearance of your jewelry box.
Lastly, don’t overlook the power of a good polish. Once the paint has been effectively removed and the box restored to your satisfaction, applying a high-quality wood polish will not only revitalize the finish but also protect it against future wear. Regular maintenance will keep your jewelry box looking beautiful for years to come, ensuring it remains a treasured piece in your collection.
When to Seek Professional Help for Paint Removal
Experiencing a frustrating acrylic paint mishap on your beloved wood jewelry box can be disheartening, especially if it holds sentimental value. While many DIY techniques can be effective, certain circumstances may warrant enlisting the expertise of a professional. When considering whether to seek professional help for paint removal, it’s essential to assess the extent of the damage and the condition of the wood.
In cases where the acrylic paint has penetrated deeply or dried extensively, the risk of further damaging the wood increases significantly with DIY methods. A professional restorer has access to specialized tools and techniques suited for various finishes, ensuring that your box is treated with care and precision. If you notice signs of the wood warping, cracking, or disfiguring after attempts to remove the paint, contacting a professional becomes imperative.
Moreover, if your jewelry box is an antique or valuable piece, seeking expert assistance to avoid diminishing its worth is advisable. Professionals can implement methods tailored to precious woods and historical finishes that require a delicate touch and a thorough understanding of the material’s nuances. This level of expertise not only increases the likelihood of successful restoration but can also enhance the box’s aesthetic appeal, allowing it to regain its former glory.
If you find yourself unsure or overwhelmed by the process, reach out to specialists who offer consultations. They can provide guidance on the best approach and clarify which methods and materials will work best for your specific piece. Ultimately, prioritizing your jewelry box’s integrity and beauty is crucial, making professional help a worthy consideration when faced with stubborn acrylic paint challenges.
Caring for Your Jewelry Box Post-Removal
Taking the time to properly care for your jewelry box after paint removal is crucial to preserving its beauty and functionality. Once you’ve successfully removed the stubborn acrylic paint, you may notice not only the relief of a fresh start but also the need for rejuvenation to mitigate any damage caused during the process.
Begin by thoroughly cleaning the surface with a gentle, non-abrasive cleaner. A mixture of warm water and mild soap will suffice; avoid harsh chemicals that could damage the wood. Use a soft cloth to gently wipe down the box, ensuring you remove any remaining residue from paint removal solvents. After cleaning, it’s essential to dry the surface completely to prevent moisture damage, which can lead to warping or mildew.
Next, consider applying a suitable wood conditioner or polish. This step not only enhances the overall appearance but also protects the wood from future wear and tear. Look for products specifically designed for your jewelry box’s type of wood. Regular polishing can help maintain its luster and prevent dust accumulation, making it easier to keep clean in the long run.
Lastly, ensure your jewelry box is stored in a stable environment, away from direct sunlight and humidity fluctuations. These factors can affect the wood’s integrity over time. Placing your box in an interior location, combined with occasional dusting and conditioning, will keep it looking pristine. Regular maintenance will not just enhance the visual appeal but also preserve the memories it holds, ensuring your jewelry box remains a cherished part of your collection for years to come.
Alternative Uses for Wood Jewelry Boxes After Cleaning
After revitalizing your wood jewelry box and removing any unwanted acrylic paint, you may find yourself with a beautifully restored piece that holds more potential than just housing your favorite accessories. Here are some innovative and functional alternative uses for your wood jewelry box that can add to its charm and utility.
One delightful option is to transform your jewelry box into a personalized storage solution for small items around your home. Consider using it to organize sewing supplies, such as thread, needles, and buttons. Not only will this keep your sewing area neat, but the box’s decorative appearance will also enhance your workspace. Alternatively, repurpose it as a charming mini stationery holder for your office or a writing desk, storing pens, paper clips, or even sticky notes.
Gift and Keepsake Storage
Beyond practical usages, your jewelry box can serve as a thoughtful container for special gifts or keepsakes. Fill it with mementos from a special occasion, such as a wedding or anniversary, creating a cherished time capsule of memories. You could also use it for letters or cards collected over the years, preserving your family history in a beautiful way. This joyful repurposing gives your jewelry box a new life as a reflection of your personal journey.
Creative Display
You can also unleash your creativity by transforming the box into a unique home decor piece. It could serve as a display for your favorite trinkets or holiday ornaments. Line it with a soft cloth or decorative paper and fill it with small plants for an eye-catching centerpiece. This way, your jewelry box not only looks striking but also contributes to your interior aesthetic.
In conclusion, your wood jewelry box, once a simple storage container for jewels, now holds the potential for a variety of practical and imaginative uses. By exploring these options, you can extend its life and ensure it continues to serve you in delightful new ways, even after its primary function has been reconsidered.
Faq
Q: How can I effectively remove acrylic paint from wooden jewelry boxes?
A: To remove acrylic paint from wooden jewelry boxes, use a damp sponge with warm water and mild soap. For stubborn areas, gently rub with rubbing alcohol applied to a cloth. Always test on an inconspicuous area first to avoid damaging the wood finish.
Q: What are some natural solutions to get acrylic paint off wood?
A: Natural solutions include using vinegar or baking soda mixed with water. Apply the solution to the paint and let it sit for a few minutes before gently scrubbing with a soft cloth. This method is eco-friendly and can help protect the wood’s finish.
Q: What should I avoid when cleaning paint off wood jewelry boxes?
A: Avoid abrasive cleaners, harsh chemicals, and excessive scrubbing, as they can damage the wood finish. It’s also best to steer clear of products that may leave residues, as this can attract dirt over time.
Q: How do I protect my jewelry box’s finish while removing paint?
A: Use a soft, lint-free cloth and work gently. Always apply cleaning solutions sparingly, and do not soak the wood, as moisture can warp it. Following up with a wood conditioner will help restore the finish after cleaning.
Q: When should I consider seeking professional help for paint removal?
A: If the paint is extensive or the wooden jewelry box is an antique or valueable, it’s best to seek professional help. A specialist can use proper methods that minimize the risk of damaging the wood while effectively removing the paint.
Q: How can I prevent future paint stains on my wood jewelry box?
A: To prevent future stains, consider keeping paint and other crafting materials in sealed containers. Additionally, using trays or drop cloths during projects can help protect your jewelry box from accidental spills.
Q: What are the best tools for removing acrylic paint from wood?
A: Recommended tools include soft sponges, microfiber cloths, and cotton swabs for precision. For tougher spots, plastic scrapers can help without scratching the wood surface. Avoid metal tools which can cause damage.
Q: Can vinegar remove acrylic paint from wood?
A: Yes, vinegar can effectively help remove acrylic paint. Mix equal parts of vinegar and water, then apply to the paint. Let it soak for several minutes before gently scrubbing with a soft cloth or sponge. This is a non-toxic solution that is friendly to wood surfaces.
Final Thoughts
Thank you for watching our guide on how to get acrylic paint off wood jewelry boxes easily! Remember, with the right tools and methods, you can restore your cherished pieces without stress. If you’re looking to dive deeper into jewelry care, check out our articles on cleaning metals and gems and DIY jewelry repairs for expert tips that can enhance your collection.
Don’t forget to subscribe for more insightful jewelry care tips and tutorials that empower you to maintain and style your pieces confidently. Have questions or experiences to share? We’d love to hear from you in the comments below! Explore our site further for resources on starting your own jewelry shop and effective branding strategies. Your journey in jewelry crafting awaits-let’s continue to shine together!