Acrylic paint can be a vibrant and transformative medium for jewelry design, but one question often arises: will it stick to metal? Understanding the compatibility of acrylic paint with various surfaces is crucial for crafters and jewelry enthusiasts looking to personalize their pieces. Imagine infusing your metal jewelry with unique colors and patterns, creating one-of-a-kind statements that reflect your style! However, without the right techniques and preparation, you may end up with peeling or chipping paint, which can be disappointing. In this guide, we’ll explore essential tips and techniques to successfully paint metal jewelry using acrylics, ensuring your creations remain stunning and durable. Get ready to elevate your jewelry-making skills and unleash your creativity!
Will Acrylic Paint Stick to Different Metal Types?
When considering whether acrylic paint will adhere well to various metal types, it’s essential to recognize that not all metals are created equal. Some metals, like aluminum and stainless steel, have smooth, non-porous surfaces that can make paint adhesion challenging, whereas metals like iron or brass, which often have more texture and a natural patina, may provide better grip for acrylics. Proper preparation and understanding the properties of the metal will greatly influence the painting outcome.
To enhance adhesion, consider these factors:
- Surface Preparation: Cleaning the metal thoroughly is crucial. Remove any grease, dirt, or oxidation with soap and water or an appropriate solvent. For compromised surfaces, lightly sanding may create a rough texture, increasing paint adherence.
- Priming: Using a suitable primer designed for metal can significantly improve the bond between the acrylic paint and the surface. Look for primers that are specifically tagged as metal primers.
- Metal Type: Consider the metal’s reactivity. Non-ferrous metals (like aluminum) may require specific approaches, while ferrous metals (like iron) might naturally bond better with paint due to their porous nature.
In practice, experimenting with small samples can yield insights into how particular acrylic paints interact with various metals. If you find that your paint does not adhere well, reassessing the preparation method or considering a specialized paint can lead to better results. In summary, understanding the metal you’re working with and preparing it properly will enhance your chances for success when painting with acrylics.
Essential Prep Steps for Painting Metal
Painting metal jewelry with acrylics can transform simple pieces into unique wearable art, but before you dive into the vibrant world of colors, proper preparation is vital for ensuring a beautiful and lasting finish. The way you prepare the metal surface directly impacts paint adhesion, durability, and aesthetic appeal. To achieve the best results, follow these essential steps that every aspiring jewelry artist should apply.
Start by giving the metal piece a thorough cleaning. Use warm, soapy water or an appropriate solvent to remove oils, dirt, and any other contaminants. For metals that may have tarnished or developed a layer of oxidation, a gentle scrub with a fine abrasive pad can help restore a clean surface. This initial cleaning phase sets the foundation for excellent paint adhesion.
Next, consider the benefits of priming. Applying a metal primer creates a suitable base that enhances the bond between the metal and acrylic paint. This step is particularly important for smooth metals like aluminum or stainless steel, where the paint may struggle to adhere without a proper primer. Look for specially formulated primers designed for metal surfaces to ensure optimal results.
Additionally, understanding the type of metal you are working with is crucial. Ferrous metals, such as iron, generally have a more porous surface, allowing paint to grip better. In contrast, non-ferrous metals require careful handling; a test application on a small area can provide insight into how well the chosen acrylics will adhere.
Lastly, don’t hesitate to experiment! Each piece of jewelry is unique, and trying different techniques such as layering or mixing colors can yield exciting, personalized outcomes. By following these prep steps, you’ll be well on your way to mastering the art of painting metal jewelry with acrylics, turning your creative vision into stunning reality.
Choosing the Right Acrylic Paint for Metal
Selecting the right acrylic paint for metal is a pivotal step that greatly influences not only the application process but also the durability and vibrancy of your finished pieces. Not all acrylic paints are designed to adhere well to metallic surfaces, so understanding the options available is essential for achieving lasting results.
When choosing your paint, look for high-quality acrylics specifically formulated for metal surfaces. These paints typically contain additives that enhance adhesion and flexibility, which are crucial when working with different types of jewelry metals. Brands that specialize in craft and hobby paints often offer varieties designated for use on metal, featuring excellent coverage and durability. Additionally, consider the finish you desire-matte, satin, or gloss-as this can significantly affect the final appearance of your jewelry.
It’s also important to assess the pigment strength of the paint. High-pigment acrylics ensure that colors remain vivid and true even on darker metal bases. If you’re covering a dark metal piece, opting for opaque acrylic paints will provide the best coverage. For more transparency or layering effects, you might choose translucent options. Always remember that multiple thin layers of paint can yield better results than a single thick application, reducing the chances of drips and uneven surfaces.
As you explore different brands and types, don’t forget to conduct test swatches. This simple step can save you time and frustration later on; apply a small amount of paint to a discreet area of your metal piece to observe how well it adheres and dries. This will also help you determine the right number of coats needed for your desired opacity and finish. With the right acrylic paint in hand, you’ll be ready to bring your creative vision to life, ensuring each piece not only looks beautiful but is built to last.
Best Techniques for Painting Jewelry with Acrylics
Painting jewelry with acrylics can transform ordinary pieces into personalized expressions of art. To achieve beautiful results, consider a few effective techniques that will enhance both the application process and the final look of your creations.
Start by ensuring that your metal pieces are thoroughly cleaned and free of any oils or residues. This step is essential for proper paint adhesion. Lightly sand the surface with fine-grit sandpaper to create a better texture for the acrylic paint to grip onto. After sanding, use a damp cloth to wipe away any dust and let the metal dry completely before painting.
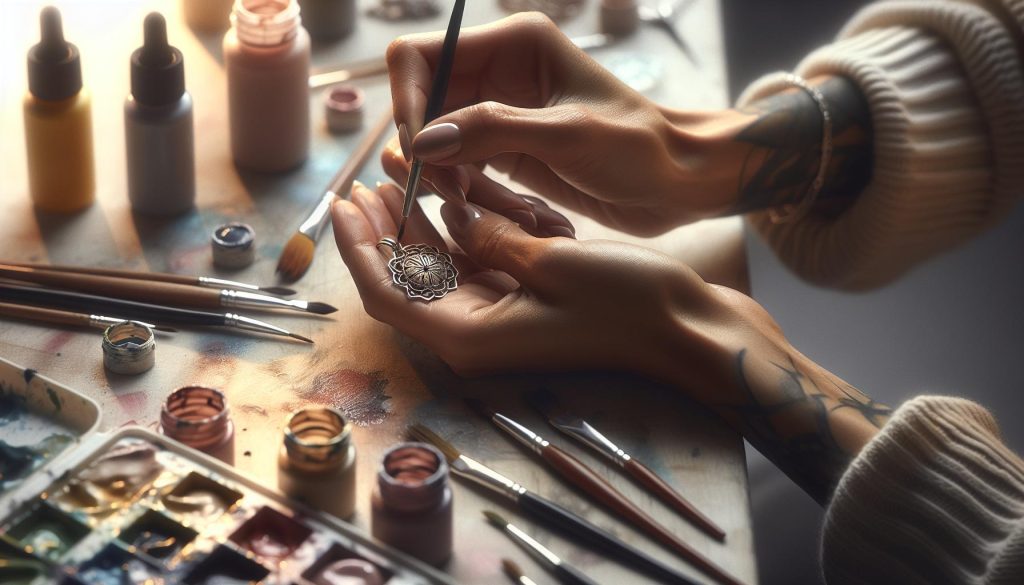
When you’re ready to paint, opt for a small, fine-tipped brush for detailed work, especially on intricate designs or tight corners. For larger areas, a sponge applicator can provide great coverage and a smooth finish. Always apply the paint in thin layers; this not only prevents drips but also helps maintain the integrity of the jewelry. Allow each coat to dry before adding subsequent layers, as this will enhance color vibrancy and ensure a more opaque finish.
To set and protect your newly painted pieces, consider sealing them with a clear acrylic spray or topcoat. This will not only serve as a barrier against scratches and wear but also enrich the colors and add a professional touch. Make sure to follow the manufacturer’s recommendations for drying times and applications, ensuring your creations stay beautiful and durable for long-term enjoyment.
Experimenting with various techniques, such as using stencils or masking tapes for patterns, can lead to unique and stunning designs. Remember to enjoy the process, and don’t hesitate to play with colors and styles-the best artworks often emerge from fearless creativity!
Tips for Achieving a Smooth Finish on Metal
Achieving a smooth finish on metal surfaces when painting with acrylics is essential for creating professional-looking jewelry pieces. Start by ensuring that your workspace is clean and free from dust. A well-ventilated area is ideal, as it helps to maintain optimal drying conditions. When preparing your metal, use fine-grit sandpaper to gently scuff the surface. This step is crucial because it not only improves paint adhesion but also creates a slightly textured surface that enhances the overall finish. After sanding, wipe the metal with a lint-free cloth or a damp paper towel to remove any residue before you start painting.
When applying acrylic paint, the technique you choose can significantly impact the smoothness of the finish. Use a fine-tipped brush or a foam applicator that allows you to control the amount of paint applied. Always opt for thin layers, as they help prevent drips and ensure an even application. A common mistake is to rush through the painting process; be patient and allow each layer to dry completely before applying the next one. This not only helps achieve better color saturation but also avoids uneven textures that can mar the final look.
In addition, consider using a clear acrylic topcoat to enhance the finish further. After your last layer of paint has dried, lightly sand the surface again with very fine sandpaper. This will smooth out any imperfections. Then, apply the topcoat in thin, even layers, allowing each coat to dry appropriately. This finishing touch adds a glossy sheen that elevates your painted metal and protects it from wear and tear. Overall, with the right preparation and techniques, you can achieve a beautifully smooth and professional-looking finish on your acrylic-painted metal jewelry.
Curing and Sealing Your Painted Jewelry
When it comes to finishing your acrylic-painted jewelry, the curing and sealing process is vital for ensuring durability and a professional appearance. Curing is not just about drying the paint; it’s about allowing the layers to fully bond and harden, enhancing the resilience of your artwork against wear and daily handling. Once you’ve completed your painting and all layers of paint are dry, the next steps are crucial to preserve your creation.
Curing Your Painted Pieces
To achieve the best result, allow your painted jewelry to cure in a dust-free environment. Depending on the thickness of your paint layers and the ambient conditions-like humidity and temperature-curing can take anywhere from 24 hours to a couple of days. If you’re eager to speed up this process without sacrificing quality, consider gently placing your pieces in a warm, dry place, away from direct sunlight. This helps reinforce the bond of the paint without causing it to bubble or deform.
Sealing for Protection
After the curing process, sealing your jewelry is key to protecting it from scratches, moisture, and everyday wear. A clear acrylic sealant or varnish is perfect for this. Choose a sealant appropriate for your type of acrylic paint-matte, satin, or glossy finishes can all be achieved depending on your preference. Here’s how to seal effectively:
- Apply Evenly: Using a clean brush or a spray nozzle, apply the sealant in thin, even layers. This helps to avoid drips and ensures a consistent finish.
- Multiple Coats: It’s advisable to apply at least two to three coats, allowing each layer to dry completely before adding the next. This builds a robust protective layer that will withstand usage.
- Avoid Overworking: Once you’ve applied a layer, avoid going back over it too soon, as this can disturb the finish and cause unwanted textures.
Once sealed, your painted jewelry should be left to dry for another 24 hours before wearing or handling extensively. This additional time allows the sealant to cure properly, ensuring your piece remains vibrant and protected.
With careful curing and sealing, your acrylic-painted metal jewelry can not only look stunning but also stand the test of time. Embrace your creativity fully knowing that these final steps will safeguard your masterpiece for years to come!
Maintaining and Caring for Your Painted Pieces
To ensure your acrylic-painted jewelry continues to dazzle, proper maintenance and care are paramount. Jewelry isn’t just an accessory; it often holds sentimental value and can be a reflection of your personal style. With a few simple practices, you can preserve the vibrancy and integrity of your painted pieces for years to come.
First, avoid exposing your jewelry to harsh environments. While acrylic paint is durable, it’s best to keep your painted pieces away from extreme temperatures, humidity, and direct sunlight, which can fade colors or weaken the bond of the paint. When not in use, store your jewelry in a soft-lined box or a padded jewelry organizer to minimize scratches and collisions with other items. Using separate compartments or soft pouches for each piece will help protect delicate designs from wear and tear.
Cleaning your painted jewelry regularly also contributes to its longevity. Use a soft, damp cloth to gently wipe away dirt and oils, as abrasive materials can scratch the paint. Avoid using chemical cleaners, as they can degrade the sealant or even the paint itself. If necessary, opt for a mild soap solution for tougher grime, ensuring that you thoroughly rinse and dry the pieces afterwards.
Finally, be mindful of how you wear your jewelry. Remove pieces before engaging in activities that might expose them to chemicals, such as swimming, showering, or applying lotions and perfumes. Taking these precautions not only keeps your jewelry looking new but also maintains its artistic integrity, allowing your creativity to shine without compromise.
Creative Ideas for Customizing Metal Jewelry
Transforming metal jewelry with acrylic paint opens a world of creative possibilities that can reflect your unique style and personality. The versatility of acrylics allows you to experiment with various colors, techniques, and embellishments, enhancing even the simplest designs into stunning pieces of art. Here are some innovative ideas for customizing your metal jewelry using acrylic paints.
One engaging approach is to create intricate patterns or designs on your metal surfaces. Using fine-tipped brushes, you can apply delicate florals, geometric shapes, or abstract designs that add depth and character to your pieces. Consider using stencils to ensure precision, or try the “sponge technique,” where you dab paint onto the surface for a textured look. This is particularly effective on pendants or earrings, where small details can make a significant impact.
Another fun idea is to layer colors to achieve a vibrant effect. Start with a base coat of a lighter shade, followed by a darker top layer that can be textured or distressed for a charming, vintage vibe. Try using a fine sandpaper or scraping tool to gently reveal the underlying color for a unique finish. You might also experiment with a gradient or ombré effect by blending different shades directly on the jewelry piece while the paint is still wet.
Incorporating other materials can also elevate your creations. For instance, consider adding beads, sequins, or metallic foil to complement your acrylic designs. This can create a mixed-media effect that pops visually. Additionally, for a more artistic flair, try painting some areas and leaving others in their natural metal state for an eye-catching contrast.
Don’t forget that personalization is key. Adding initials, meaningful quotes, or even small symbols can turn a piece into a cherished keepsake. Use a fine brush or a paint pen for precise lettering, and consider experimenting with different font styles to match the aesthetic of the jewelry.
These ideas offer just a glimpse into the endless potential of customizing metal jewelry with acrylic paint. By harnessing your creativity and utilizing various techniques, your jewelry can become a true expression of who you are. So gather your supplies, and let your imagination run wild!
Common Mistakes to Avoid When Painting Metal
When it comes to painting metal jewelry with acrylics, missteps can lead to frustration and subpar finishes. Understanding what pitfalls to avoid makes the creative process smoother and the results more rewarding. One common mistake is neglecting proper surface preparation. Many enthusiasts underestimate the importance of cleaning and roughening the metal surface before applying paint. A quick wipe with rubbing alcohol followed by gently sanding with fine-grit sandpaper creates a texture for better adhesion, ensuring the paint won’t chip or peel over time.
Another frequent error is applying too thick a coat of paint at once. Beginners often think that a heavy application will provide better coverage, but this can lead to drips, bubbles, or uneven textures. Instead, aim for multiple thin layers. This allows for smoother application and quicker drying times, and it also gives you greater control over the final appearance. Remember, you can always build up color gradually.
It’s also crucial to choose the right type of acrylic paint specifically designed for metals. Many people opt for craft-store acrylics unaware that not all paints will adhere to metal surfaces properly. Look for high-quality, multi-surface acrylics or paints designed for use on metal to avoid issues like flaking or discoloration that can occur later.
Lastly, skipping the sealing process can be a costly mistake. Acrylic paint, while versatile, is not inherently waterproof or scratch-resistant. A clear acrylic sealer applied after the paint is completely dry helps provide durability and protects your artwork from everyday wear and tear. This extra step can significantly extend the life of your painted jewelry, allowing you to enjoy your creative expressions for years to come.
By being aware of these common mistakes and taking proactive steps to avoid them, you can confidently transform your metal jewelry pieces into stunning, personalized works of art. Embrace your creativity and enjoy the journey of artistic expression!
Expert Advice on Removing Paint from Metal
Removing paint from metal can feel daunting, especially for jewelry makers aiming to salvage pieces gone awry. However, understanding the right techniques makes the process smoother and less stressful. Acrylic paints are known for their versatility, but sometimes you find yourself in a situation where you need to strip the paint to start fresh. With the right methods, you can do this effectively and preserve the integrity of your metal jewelry.
To begin with, consider using a gentle paint remover designed specifically for acrylics. Look for products labelled “non-toxic” and suitable for metals, as some removers can be too abrasive and might damage your pieces. Apply the remover according to the manufacturer’s instructions, usually allowing it to sit for a few minutes to soften the paint. Once it’s ready, use a soft cloth or a fine-bristled brush to gently scrub away the paint. Always test on a small, inconspicuous area first to ensure the metal doesn’t react adversely.
Additionally, you can opt for natural methods if you prefer to avoid chemical removers. Soaking the painted item in a solution of warm water mixed with dish soap can work wonders on lighter applications of paint. After soaking for a few minutes, use a soft sponge or cloth to wipe the paint away. If the paint is stubborn, consider adding a bit of baking soda to create a mildly abrasive cleaner, which will help lift the paint without scratching the metal surface.
Another effective yet simple technique involves using isopropyl alcohol or rubbing alcohol, especially for small areas or intricate designs. Dampen a cloth with the alcohol and gently rub over the painted areas. This not only helps remove paint but also evaporates quickly, reducing the risk of water damage to your metal jewelry.
In all cases, make sure to rinse your jewelry thoroughly after using any removal method to ensure no residue lingers. Once the paint is removed, follow up with a metal polish to restore shine and protect your piece from tarnishing. With these expert tips, you can reclaim your jewelry pieces and start anew, embracing the creativity and artistry that comes with custom painting.
FAQs About Acrylic Painting on Metal
When venturing into the world of painting metal with acrylics, many enthusiasts find themselves with a myriad of questions. Understanding these inquiries can significantly enhance your painting experience and results. Here’s a look at some common queries regarding acrylic painting on metal, alongside practical advice to guide both beginners and seasoned artists.
One of the most frequently asked questions is whether acrylic paint will adhere properly to different types of metal. Acrylics typically stick well to materials like aluminum, brass, and copper when properly prepared. The key to ensuring a good bond is surface preparation. Removing any oil or grease and lightly sanding the metal surface can create a suitable texture for the paint to grip onto. Additionally, applying a primer designed for metal can enhance the adhesion and durability of the acrylic paint.
Another common concern is the durability of acrylic paint on metal jewelry. Once fully cured, acrylics can be quite durable; however, they may not be completely waterproof or resistant to scratching unless sealed effectively. A clear acrylic sealant or polyurethane can provide an extra layer of protection, making your painted pieces more resilient to everyday wear.
For those looking to incorporate intricate designs or vivid colors, the question often arises about the best techniques to use. Many artists find that working with smaller brushes allows for greater detail, while larger brushes can cover broader areas quickly. Additionally, using techniques such as sponging or stippling can create unique textures, adding depth and interest to your jewelry designs.
In terms of maintenance, it’s essential to care for your painted pieces properly to extend their life. Regularly dusting your jewelry and avoiding exposure to extreme heat or moisture will help maintain the integrity of your artwork. If needed, gently cleaning with a soft cloth can keep your painted surfaces looking fresh.
By addressing these FAQs, you empower yourself to tackle your acrylic painting projects with confidence, transforming metal into personalized expressions of art that reflect your unique style.
Inspiring Success Stories from Jewelry Artists
In the vibrant world of jewelry design, countless artists have transformed their creative visions into stunning pieces by utilizing acrylic paint on metal. For example, consider the story of Emma, a hobbyist turned professional jewelry maker who discovered that a simple set of acrylic paints could elevate her work from ordinary to extraordinary. After experimenting with various metal types, she found that her aluminum and brass pieces became blank canvases for her colorful designs. By choosing high-quality acrylics and properly prepping her surfaces, she achieved a durable finish that could withstand daily wear.
Another inspiring tale comes from David, an artist passionate about upcycling. He sources old metal jewelry and gives it new life using acrylic paint. Leveraging techniques like stippling and layering, David has created intricate textures that not only capture attention but also tell a story of renewal. His work emphasizes the importance of surface preparation-sanding and cleaning each piece ensures the paint adheres beautifully, enabling him to craft one-of-a-kind creations that reflect both artistry and sustainability.
Many successful jewelry artists also emphasize the importance of protective sealing. For instance, Sarah, who specializes in whimsical designs for children’s jewelry, found that applying a clear acrylic sealant after painting not only enhanced the colors but also added a layer of protection against scratches and moisture. This simple step significantly increased the longevity of her pieces, allowing her young customers to enjoy them to the fullest.
These stories exemplify the power of creativity, preparation, and technique in acrylic painting on metal. As you embark on your own jewelry painting journey, remember that each project can be a unique expression of your style, much like the talented artists who have come before you. Embrace the process, experiment with different approaches, and most importantly, let your imagination run wild!
Frequently Asked Questions
Q: Can I use acrylic paint on all types of metal?
A: Yes, acrylic paint can be used on various types of metal, but adhesion may vary. Always test on a small area first. For optimal results, clean the metal surface and use a suitable primer to enhance paint adherence.
Q: How do I prepare metal surfaces before painting with acrylics?
A: Start by cleaning the metal to remove dust and grease. Use a fine-grit sandpaper to scuff the surface, promoting better paint adherence. Apply a primer designed for metal if possible, as it significantly improves the paint’s durability.
Q: What type of acrylic paint is best for painting jewelry?
A: Look for acrylic paints labeled as “miniatures” or “craft paint,” which are designed for detailed work. These paints provide a fine finish and come in a variety of colors, perfect for jewelry projects.
Q: How long does it take for acrylic paint to dry on metal?
A: Acrylic paint typically dries to the touch within 30 minutes to an hour, but full curing may take 24 hours or more. To ensure durability, allow ample drying time before handling painted jewelry.
Q: Can I seal acrylic paint on metal jewelry?
A: Yes, sealing acrylic paint is advisable to protect your artwork. Use a clear acrylic sealer or varnish suitable for metal. Apply after the paint has thoroughly dried to extend the longevity of your design.
Q: How can I fix mistakes when painting acrylic on metal?
A: If you make a mistake, wait for the paint to dry, then gently sand the area with fine-grit sandpaper. You can repaint the area once it’s clean and smooth. Always have a little water on hand to blend.
Q: Is it safe to wear acrylic-painted jewelry?
A: Generally, acrylic paints are non-toxic when dry. However, ensure that the paint is sealed properly to prevent any chemicals from leaching out and causing skin irritation. Regularly inspect for wear and damage.
Q: How do I make my painted jewelry more durable?
A: To increase the durability of your painted jewelry, seal your design with an epoxy resin or clear sealant. Store pieces away from direct sunlight and moisture to maintain their appearance over time.
For more in-depth tips on preparing metal and caring for your painted jewelry, check out the sections on Essential Prep Steps for Painting Metal and Maintaining and Caring for Your Painted Pieces in our article. Happy painting!
Insights and Conclusions
Now that you’re equipped with essential tips on using acrylic paint on metal, it’s time to unleash your creativity! Remember, selecting the right acrylic paint can make a significant difference, and ensuring proper surface preparation is key to achieving stunning results. If you’re interested in expanding your crafting journey, check out our guides on jewelry care and DIY tutorials for even more insights that can elevate your artistic endeavors.
Don’t hesitate to join our newsletter for exclusive tips and tricks, ensuring you stay updated on all things jewelry painting. Explore more about cleaning gems and metals or dive into our resources on starting your own jewelry shop-each link filled with valuable content tailored just for you. Your creative adventure awaits, so grab your materials and start painting today!
We’d love to hear about your experiences and any challenges you faced-share your thoughts in the comments below! Together, let’s create a vibrant community of jewelry enthusiasts!