When it comes to crafting beautiful beaded jewelry, the materials you choose can greatly affect the lifespan and appearance of your creations. Acrylic yarn, known for its vibrant colors and versatility, is a popular choice among jewelry makers. However, maintaining the vibrancy and quality of acrylic yarn requires proper cleaning techniques to keep your accessories looking fresh and stylish. Whether you’re a seasoned jeweler or just beginning your creative journey, learning how to effectively wash acrylic yarn is essential for ensuring your beaded pieces retain their charm. In this guide, we’ll delve into practical tips and methods for washing and caring for your acrylic yarn jewelry, helping you protect your investment and enhance your crafting experience. Dive in to discover the best practices that will keep your accessories sparkling and ready to showcase!
Understanding Acrylic Yarn: Properties and Benefits
Acrylic yarn is rapidly gaining popularity among crafters and designers due to its remarkable versatility and user-friendly qualities. One of the most significant benefits of this synthetic fiber is its lightweight nature, making it an ideal choice for a variety of projects, from cozy blankets to delicate apparel. Acrylic yarn mimics the softness of natural fibers while offering vibrant colors that resist fading, lending a cheerful touch to any creation. Additionally, it is easy to care for, which is especially crucial when pairing it with beaded jewelry accessories that may require special handling.
Another attractive feature of acrylic yarn is its hypoallergenic properties, making it suitable for those with sensitive skin. This means you can confidently use it for projects intended for children or individuals prone to allergies. The durability of acrylic yarn also stands out; it is resilient against wear, maintaining its shape and texture throughout multiple washes. This quality is vital when using it in conjunction with beaded jewelry, as both components must withstand regular handling without losing their appeal.
When working with beaded designs, acrylic yarn offers a fantastic combination: its texture complements various styles of beads, whether they are shiny glass or matte wooden options. Additionally, the elasticity of acrylic yarn provides security for beads, ensuring they are kept in place without the risk of breakage or losing their aesthetic appeal. This synergy allows crafters to explore an array of creative possibilities while ensuring the integrity of both materials.
In conclusion, opting for acrylic yarn in your crafting endeavors not only guarantees vibrant, long-lasting creations but also enhances your ability to design intricate beaded jewelry accessories. Embracing this fiber can elevate your projects, giving you the confidence to experiment and innovate in your crafting journey.
Essential Cleaning Techniques for Acrylic Yarn
Acrylic yarn, with its vibrant colors and ease of maintenance, has become a favorite among crafters, making it crucial to know how to keep it clean, especially when it’s paired with delicate beaded jewelry. Regular cleaning not only extends the life of your projects but also enhances their appearance, ensuring that both the yarn and beads look their best together. Here are some essential techniques to keep in mind when caring for your acrylic yarn, especially in the context of beaded accessories.
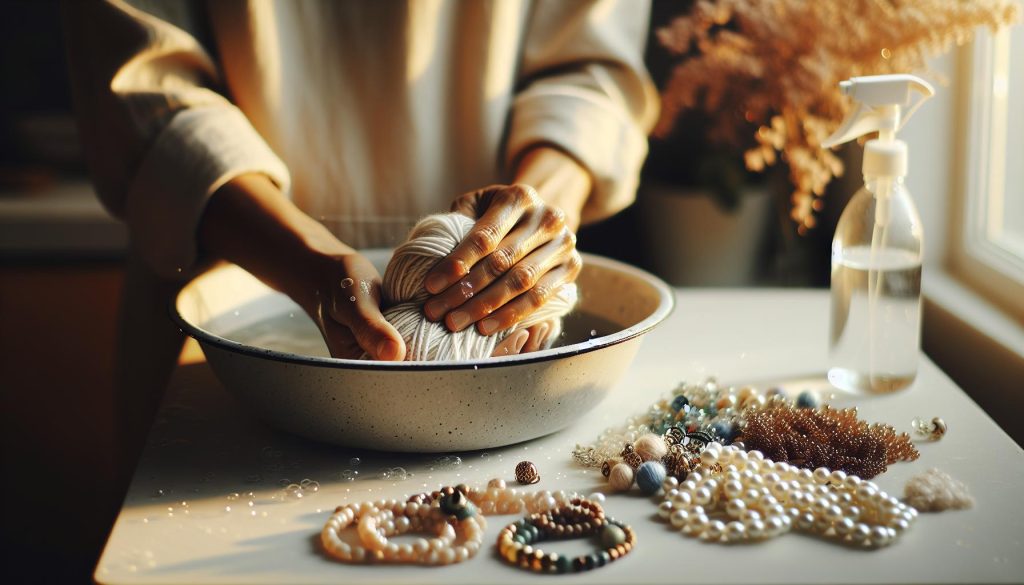
To maintain the integrity of acrylic yarn, it’s vital to start with a gentle approach. Always opt for mild detergents that are free of bleach or fabric softeners. These harsh chemicals can strip the yarn of its vibrant color and sheen, ultimately harming its texture. For routine cleaning, hand washing is often the safest method. Fill a basin with cool or lukewarm water and add your detergent, gently immersing the yarn or finished piece. Avoid vigorous scrubbing; instead, allow it to soak for about 10-15 minutes, which will help lift dirt and oils without damaging fibers or beads.
After soaking, gently rinse the yarn in cool water until all detergent is removed. When it comes to drying, avoid wringing or twisting the yarn to prevent distortion. Instead, lay it flat on a clean, dry towel and roll the towel up to absorb excess water. For cleaning beaded jewelry made with acrylic yarn, ensure that any metal components are not submerged in water for extended periods to prevent tarnishing.
For those daring enough to use a washing machine, select a delicate cycle and place your yarn-based items in a mesh laundry bag to protect them. Always wash acrylic items separately from heavier fabrics like towels to prevent snagging. Use cold water and a gentle detergent, followed by air drying away from direct sunlight to prevent fading. By following these cleaning techniques, you can preserve the lustrous beauty of both your acrylic yarn projects and beaded jewelry for years to come.
Top Tips for Stain Removal on Acrylic
When dealing with stains on acrylic yarn, quick and effective action is essential to maintain the vibrant look of your projects. Acrylic is generally stain-resistant, but some substances can leave their mark. For instance, oils from your skin, food spills, or even dirt can penetrate the fibers if not addressed promptly. Here are some efficient methods to remove stains without compromising the integrity of your yarn.
Start by identifying the type of stain you’re dealing with. For common stains like food or grease, using a gentle detergent mixed with cool water is a great first step. Create a simple solution by combining a few drops of mild detergent with a bowl of cool water. Dip a clean, soft cloth or sponge into this solution and gently dab the stained area, being careful not to rub, as this might damage the fibers and disturb any attached beads.
For stubborn stains, consider using white vinegar or rubbing alcohol. Both are effective stain removers that won’t harm acrylic. Mix equal parts of white vinegar and water, or use a small amount of rubbing alcohol directly on the stain, blotting gently. Always test these solutions on a hidden section first to ensure they don’t alter the color or texture of your yarn.
Additionally, there are some key steps to keep in mind to prevent staining altogether. When working with acrylic yarn in jewelry, be mindful of the materials nearby that might shed dyes or oils. Make sure to store projects in a clean, dry place, and use a protective cover if they are exposed to potential staining agents. To avoid damaging any beads interwoven with the yarn during washing, consider removing them if possible or employing mesh wash bags designed for delicate items. Regular maintenance and addressing stains early can help you enjoy your beautiful acrylic yarn and beaded accessories for years to come.
How to Wash Acrylic Yarn by Hand
Washing acrylic yarn by hand is a gentle process that ensures your projects remain vibrant and intact without the risk of damage from harsh machine agitation. Whether you’re refreshing a knitted scarf or cleaning a yarn used in beaded jewelry, proper hand washing can maintain both the texture of the yarn and the integrity of any embellishments. To effectively hand wash acrylic yarn, follow a few straightforward steps that cater to sensitive fibers.
Start by filling a basin with cool water, as hot water can lead to potential shape distortion or pooling of fibers. Add a small amount of a gentle detergent specifically designed for knitwear or delicates; avoid harsh chemicals to prevent any adverse reactions with the acrylic fibers. Submerge your yarn or project gently, ensuring it’s fully soaked without twisting or scrubbing, as this could stretch or damage your work.
After allowing the yarn to soak for approximately 10 to 15 minutes, it’s time to rinse. Carefully lift the piece from the basin and let the soapy water drain. Then, refill the basin with clean, cool water and submerge the yarn again. You may need to rinse multiple times until all soap residues are removed. When rinsing, remember to support the yarn’s structure and avoid wringing it out, which can lead to misshapen results or bead detachment.
Once thoroughly rinsed, lay the fabric flat on a clean, dry towel. Gently press the towel against the yarn to absorb excess water, being careful not to twist or squeeze the fabric. Afterward, allow your yarn to air dry completely, preferably in a well-ventilated area away from direct sunlight to prevent fading. By following these steps, you can keep your acrylic yarn looking fresh while ensuring any intricate beadwork remains beautifully intact.
Machine Washing Acrylic Yarn: Dos and Don’ts
When it comes to maintaining the vibrancy and integrity of acrylic yarn, especially when it is integrated into beaded jewelry projects, machine washing can be a double-edged sword. Understanding the dos and don’ts of this method will help you clean your beautiful creations safely and effectively.
Dos of Machine Washing Acrylic Yarn
- Use a mesh laundry bag: This provides extra protection against the agitation of the washing machine, preventing tangles and potential bead loss.
- Select a gentle cycle: Opt for a delicate or hand-wash cycle to minimize the risk of damaging your yarn’s fibers.
- Cold water only: Always wash in cold water, as hot water can cause acrylic fibers to distort or shrink.
- Choose mild detergent: Use a detergent designed for delicates, avoiding harsh chemicals or bleach that can degrade yarn quality.
Don’ts of Machine Washing Acrylic Yarn
- Avoid fabric softeners: These can leave residues that make yarn feel greasy and reduce its elasticity.
- Don’t overload the machine: Giving your pieces enough space will prevent them from getting tangled or squished against each other.
- Never wring or twist: After washing, resist the urge to wring out your projects, as this can lead to misshaping or damaging the beads.
- Don’t machine dry: High heat can not only damage acrylic fibers but can also loosen attached embellishments. Instead, air dry your items after washing.
By following these guidelines, you can effectively use your washing machine to clean acrylic yarn without compromising the quality of your projects. This approach not only preserves the beauty of your work but also ensures that your beaded jewelry accessories remain stunning for years to come.
Drying Methods for Acrylic Yarn After Washing
After washing your acrylic yarn creations, the drying process is crucial for preserving their shape and appearance, especially when your projects include delicate beads. Proper drying techniques ensure that both the yarn and the embellishments maintain their integrity, so your artistic efforts remain flawless.
For best results, always opt for air drying your acrylic yarn. Lay your piece flat on a clean, dry towel to absorb excess moisture before placing it on a drying rack or hanging it in a well-ventilated area. This method prevents the fabric from stretching and keeps your beaded designs intact. Additionally, avoid hanging yarn directly from a clothesline or hook, as this can pull and distort the fabric, leading to an uneven finish.
Another effective technique is to reshape your items while damp. Gently smooth out any wrinkles or uneven sections while they are still wet, ensuring the desired appearance is maintained when completely dry. Be sure to keep your projects away from direct sunlight, as UV rays can fade colors and weaken fibers over time. Instead, seek a shaded, airy space that promotes gentle drying without harsh environmental effects.
Lastly, consider investing in a dedicated drying rack designed for delicate fabrics, which can provide optimal airflow. This not only speeds up the drying process but also aids in maintaining the yarn’s structure. By caring for your acrylic yarn properly during drying, you ensure that your beaded jewelry projects remain vibrant, intact, and ready to dazzle.
Caring for Beaded Jewelry: Essential Guidelines
Caring for beaded jewelry requires a blend of attentiveness and technique to ensure that these delicate pieces remain as stunning as the day they were crafted. Understanding the unique characteristics of your beads-whether they are glass, acrylic, or natural materials-will significantly influence how you maintain them. Each type of bead may react differently to cleaning agents or methods, making careful handling essential.
When it comes to cleaning beaded jewelry, a gentle approach is always best. Start by checking for any loose beads or fittings. If you notice any, repair them before cleaning to prevent further damage. For regular maintenance, a soft, lint-free cloth is perfect for removing dust and fingerprints without scratching the surface. If your beads are particularly dirty, create a mild soap solution with lukewarm water, dabbing rather than soaking your pieces to avoid loosening the glue or damaging the stringing material.
Storage plays a crucial role in preserving the beauty of your beaded jewelry. Invest in a soft-lined jewelry box or pouches to help prevent scratches and tangles. When storing, separate pieces by type or color and consider using dividers to keep them organized. For particularly intricate pieces, consider hanging them on a display to minimize the risk of damage from compression or weight.
Lastly, when pairing your beaded accessories with acrylic yarn projects, think about contrast and harmony. The vibrancy of your yarn can complement the sparkle of your beads, enhancing the overall aesthetic. Opt for yarn colors that mirror or accentuate the bead colors, creating a cohesive look. Whether you are crafting a necklace, bracelet, or handbag, your choices can significantly elevate the visual impact of your creations while ensuring that both elements-beads and yarn-are cared for and maintained properly.
Best Practices for Storing Beaded Accessories
Storing your beaded accessories properly is essential not only for maintaining their beauty but also for prolonging their lifespan. Did you know that improper storage can lead to scratches, tangles, and even damage to the threads or strings holding your pieces together? By implementing a few simple strategies, you can keep your beaded jewelry looking as stunning as the day you made them.
A great starting point is to ensure that your beads are stored in a cool, dry place away from direct sunlight. Heat and moisture can cause materials to expand or warp, especially in delicate pieces. Invest in a soft-lined jewelry box or pouches specifically designed for beads and jewelry. These storage solutions can help prevent scratching and tangling while providing a cozy environment for your treasured items.
When organizing your jewelry, consider using dividers or compartments within your jewelry box. This practice not only keeps your pieces separate but also allows you to see what you have at a glance, making it easier to pick the perfect accessory for any occasion. For more intricate designs, hanging jewelry displays are a fantastic option. They prevent compression and reduce the risk of damage, while also showcasing your beautiful creations as decorative elements in your home.
If you’re preparing to craft a new piece or simply wish to keep your existing accessories in pristine condition, remember to regularly check your storage setup. Routine maintenance can include dusting the storage area and inspecting individual pieces for wear. By following these best practices, you’ll ensure your beaded accessories remain captivating and ready to dazzle whenever you wear them.
Repairing and Reviving Beaded Jewelry
Repairing beaded jewelry can be a rewarding experience, allowing you to restore cherished pieces to their former glory. Whether it’s a strand of pearls that’s lost its clasp or a colorful bracelet with some beads out of place, knowing how to fix these issues can extend the life of your accessories and keep them looking beautiful. The first step in any repair is to assess the damage-analyzing what needs fixing can help determine the best course of action.
Tools and Materials You May Need
Having the right tools on hand can make repairs easier and more effective. Some essential tools include:
- Wire cutters – For cutting stubborn threads or wires.
- Jewelry pliers – Useful for bending, twisting, and clasp repairs.
- Bead thread or wire – Make sure it matches the thickness and strength needed for your project.
- Needles – A beading needle works wonders for threading beads with smaller holes.
- Super glue or epoxy – For fixing broken pieces that need a strong hold.
Start by carefully re-threading any broken necklaces or bracelets. Use a needle to guide the thread through the beads, ensuring each bead is securely placed. If a clasp is faulty, replace it with a new one, making sure it’s the right size and style for your piece. For strung beads, knot the thread between the beads to prevent them from sliding and clumping together.
Reviving Dull Pieces
When your beaded jewelry starts to look lackluster, even the most expertly crafted pieces can benefit from a little TLC. Gently cleaning them with warm soapy water can help revitalize their shine. Use a soft cloth to wipe away any dirt or oils that have settled onto the surface. For extra sparkle, consider using a jewelry polishing cloth specifically designed for beads, which can help restore their luster without scratching.
If your piece has beads made of materials that risk damage when submerged, such as certain types of acrylic or natural stones, be mindful to clean them individually. Avoid harsh chemicals or abrasive scrubs that may wear down the finish. After cleaning, allow pieces to dry completely before storing them or wearing them again.
By taking these steps, you can not only repair but also revive your beaded jewelry. Enjoy the satisfaction of restoring your favorite accessories, giving them new life and ensuring they continue to be a beautiful part of your collection for years to come.
Tips for Pairing Acrylic Yarn with Beaded Jewelry
Integrating acrylic yarn into your beaded jewelry designs can elevate your creations, offering a vibrant texture and an opportunity for creative expression. The combination of the soft, colorful fibers with shimmering or matte beads can yield stunning results, whether you’re crafting necklaces, bracelets, or mixed-media art pieces. To achieve the best pairing, consider the weight and texture of both your yarn and beads, ensuring they complement each other without overwhelming the overall design.
When selecting beads to match your acrylic yarn, keep in mind the color palette. Bold, chunky beads can create a striking contrast against a delicate, lacy crochet piece made with lightweight acrylic yarn, while softer, semi-transparent beads can seamlessly blend into a cozy, chunky project. Experiment with various bead shapes and sizes to find innovative ways to incorporate them-think yarn-wrapped beads or even beads that can be strung onto the yarn itself before knotting them into your designs.
Incorporating Beads into Yarn Projects
Consider these practical tips for successfully integrating beads into your acrylic yarn pieces:
- Stringing Beads: When working with acrylic yarn, it’s often helpful to pre-string your beads onto the yarn. This method allows you to have full control over spacing and placement, making it easier to create balanced designs.
- Bead Placement: Use beads sparingly or strategically at focal points to create visual interest without distracting from the yarn’s inherent texture. For example, placing a few beads on a scarf’s end can add a playful touch.
- Finishing Touches: Consider using acrylic yarn to create tassels or fringes adorned with beads. This technique not only adds movement but also harmonizes the elements beautifully.
Care and Maintenance
To maintain the vibrancy of your beaded yarn projects, washing and care play a crucial role. Always refer to the washing instructions based on the materials used. Handwashing is typically the safest method for acrylic yarn and beaded jewelry, ensuring that colors don’t bleed and the integrity of the beads remains intact. When cleaning, use lukewarm water and a gentle soap to preserve both the yarn and beads. When rinsing, avoid any harsh chemicals that may affect the finish of your beads or the softness of the yarn.
By thoughtfully pairing acrylic yarn with beads, you can create exquisite pieces that are both functional and fashionable. Embrace the versatility of these materials, and don’t hesitate to experiment-your next favorite accessory could be just a creative leap away!
Avoiding Damage to Beads During Cleaning
Cleaning your beaded jewelry while ensuring the delicate beads remain intact is essential for preserving the overall beauty of your creations. Beads, whether made of glass, plastic, or metal, can be particularly susceptible to damage during the washing process. Understanding how to carefully clean your acrylic yarn pieces and beads will help you maintain their vibrancy and longevity.
When preparing to wash your beaded jewelry, it’s crucial to assess the type of beads used. For instance, glass and semi-precious stone beads can be more fragile and may crack or chip under pressure. To protect them during cleaning, consider using a gentle handwashing method. Fill a basin with lukewarm water mixed with a mild soap, and gently submerge your piece. Avoid vigorous scrubbing; instead, lightly agitate the water with your fingers to clean the yarn without damaging the beads.
To further minimize risk, you can employ additional protective measures. Using a mesh laundry bag can help shield your jewelry from being jostled around too much if you must clean it in a washing machine. Alternatively, for pieces with more intricate beadwork, you might consider spot cleaning with a damp cloth rather than submerging the entire piece. This targeted approach safeguards your beads from potential exposure to excess water, which may weaken the threads and adhesives that hold them in place.
Finally, after washing, exercise caution during the drying process. Opt for air drying by laying the jewelry flat on a clean, absorbent towel. Avoid direct sunlight and heat sources, as they can fade colors and warp the materials. For pieces with metal components, ensure that moisture is completely evaporated to prevent any rust or tarnishing. With these thoughtful care techniques, your beaded jewelry can stay beautiful and ready to wear for years to come.
Maintaining the Longevity of Acrylic Yarn Projects
Maintaining your acrylic yarn projects not only enhances their appearance but also significantly extends their life. Acrylic yarn is prized for its durability and ease of care, making it a favorite among crafters and jewelry makers alike. However, to ensure the longevity of your creations, particularly when combining them with delicate beaded jewelry, it’s essential to adopt some effective preservation practices.
One of the fundamental aspects of prolonging the life of acrylic yarn pieces is to store them properly. When not in use, keep your acrylic yarn in a cool, dry place, away from direct sunlight. Ultraviolet rays can weaken the fibers over time, leading to fading or brittleness. Consider using storage bins or fabric bags that allow for breathability to prevent any moisture buildup. Adding silica gel packets can absorb excess humidity, further protecting your projects from mold or mildew.
Cleaning acrylic yarn requires a gentle touch, especially when your project incorporates beads. Always hand wash items with lukewarm water and a mild detergent to maintain the vibrant colors and integrity of both the yarn and the beads. Avoid harsh chemicals and fabric softeners, as these can cause damage. After washing, roll the item in a towel to remove excess water rather than twisting it, which can stretch the yarn and distort its shape.
When it comes to using acrylic yarn in conjunction with beaded jewelry, there are a few tips to keep in mind. Consider the order of assembly; attach beads after completing the yarn project whenever possible. This reduces the risk of abrasive contact during the cleaning process. If beads must be affixed beforehand, use a strong adhesive specifically designed for textiles to keep them secure but also allow for easy replacement if necessary.
Lastly, inspect your acrylic yarn projects regularly for signs of wear or damage. Addressing minor issues like loose threads or damaged beads promptly can prevent larger problems down the line. By incorporating these mindful maintenance practices, your acrylic yarn and beaded accessories can thrive, allowing you to enjoy your creative expressions for years to come.
Q&A
Q: How frequently should I wash acrylic yarn items?
A: It’s advisable to wash acrylic yarn items after 5-10 uses, or when visibly soiled. Frequent washing can shorten the lifespan of your yarn projects. Always check for stains or odors first, and refer to the “Essential Cleaning Techniques for Acrylic Yarn” section for best practices.
Q: Can I use fabric softener on acrylic yarn?
A: Avoid fabric softeners on acrylic yarn, as they can leave a residue that affects texture and durability. Instead, wash it with mild detergent, following the “Machine Washing Acrylic Yarn: Dos and Don’ts” for optimal care.
Q: What is the best way to remove pilling from acrylic yarn?
A: To remove pilling, use a fabric shaver or a lint roller gently on the surface. Avoid pulling at the pills, as this can damage the fibers. Check the “Top Tips for Stain Removal on Acrylic” section for additional care tips.
Q: How can I refresh beaded jewelry without washing it?
A: For a quick refresh of beaded jewelry, lightly dust or wipe with a soft, lint-free cloth. This prevents damage to both the beads and the stringing material. Explore the “Caring for Beaded Jewelry: Essential Guidelines” for more maintenance tips.
Q: Is it safe to wash beaded jewelry with acrylic yarn items?
A: No, it’s not safe. Washing beaded jewelry can damage it, while acrylic yarn should be washed separately to avoid tangling or discoloration. Refer to “Avoiding Damage to Beads During Cleaning” for strategies on keeping both in top condition.
Q: How do I protect my beaded jewelry when washing acrylic yarn?
A: Always remove beaded jewelry before washing acrylic yarn to protect it from water or detergent exposure. Store the jewelry in a soft pouch to prevent scratches and refer to the “Best Practices for Storing Beaded Accessories” section for complete care.
Q: What temperature should I wash acrylic yarn items?
A: Wash acrylic yarn items in cold or warm water (maximum 40°C/104°F). High temperatures can cause fibers to shrink or lose their shape. Check the “Machine Washing Acrylic Yarn: Dos and Don’ts” section for thorough guidelines.
Q: Can I air dry acrylic yarn after washing?
A: Yes, air drying is best for acrylic yarn to maintain its shape and integrity. Lay it flat on a clean towel or hang it up, avoiding direct sunlight. For thorough drying tips, see “Drying Methods for Acrylic Yarn After Washing.”
The Way Forward
Now that you’re equipped with essential tips for washing acrylic yarn and caring for your beaded jewelry accessories, it’s time to put that knowledge into action! Remember, regular maintenance not only enhances the longevity of your jewelry but also keeps it looking its best. If you’re interested in more hands-on guides, check out our articles on effective jewelry cleaning techniques and DIY storage solutions for your beaded treasures.
Don’t miss out on future tips; subscribe to our newsletter for exclusive insights directly to your inbox! Have any questions or suggestions? We’d love to hear from you in the comments below-your feedback helps us create even better content. By taking these simple steps, you’re not just caring for your accessories; you’re investing in lasting beauty and style. Explore more of our resources today, and let your creativity shine!