Have you ever wanted to personalize your accessories but felt overwhelmed by the options? Making your own acrylic keychain is a fun and fulfilling DIY project that allows you to express your unique style and creativity. Not only are these keychains practical, but they also serve as charming gifts or memorable keepsakes. In this tutorial, we’ll guide you through the simple steps to create eye-catching acrylic keychains that reflect your personality. Whether you’re an experienced crafter or just starting out, this project offers a rewarding way to enhance your jewelry collection, make thoughtful gifts, or even embark on a small business venture. So, grab your materials and let’s dive into the colorful world of acrylic crafting!
Choosing the Right Acrylic Material for Keychains
Choosing the right acrylic material for your keychain can make all the difference in crafting a durable and visually appealing accessory. Acrylic is favored for keychain projects due to its lightweight nature, vibrant colors, and ease of manipulation. When selecting your acrylic, consider the thickness, transparency, and finish. Thicker sheets (around 1/8 inch) provide sturdiness without being overly heavy, thus ensuring a comfortable fit on your keys.
There are two main types of acrylic you might consider: cast acrylic and extruded acrylic. Cast acrylic generally offers better clarity, deeper colors, and is also more resistant to UV damage, making it a preferred choice for decorative pieces that will be exposed to sunlight. On the other hand, extruded acrylic is typically more cost-effective and easier to cut but may not have the same superior optical properties. Pairing your chosen acrylic with the right tools is essential for achieving clean cuts and finishes.
When it comes to colors and designs, the options are virtually endless. You can find transparent, opaque, mirrored, and even frosted varieties, allowing you to customize your keychain to your liking. If you’re inclined towards creativity, consider incorporating glittery or glow-in-the-dark styles to make your keychain stand out. Always remember, whatever acrylic you choose, ensuring it meets your aesthetic goal and practical needs will enhance your overall DIY experience.
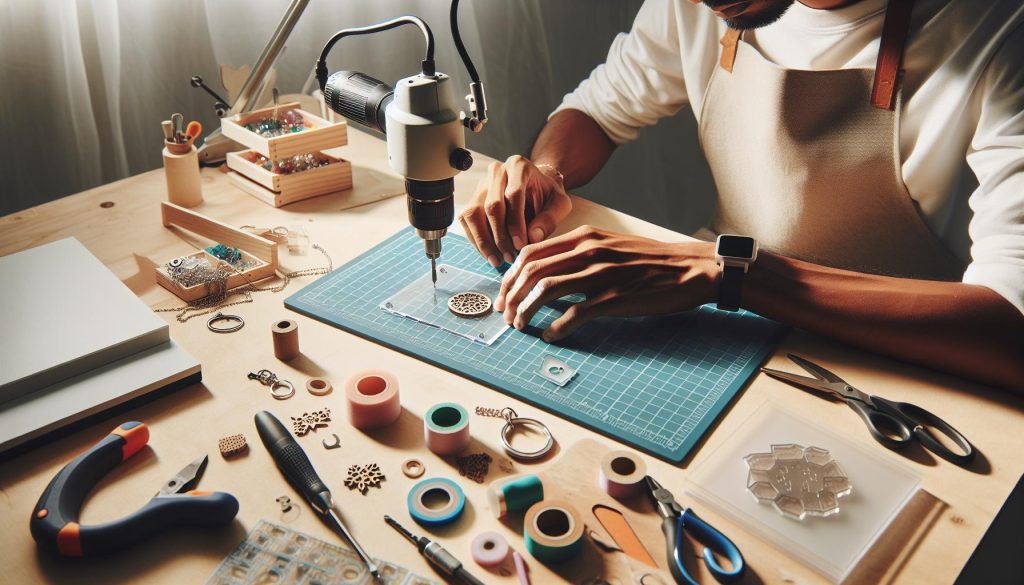
Essential Tools for Your DIY Acrylic Keychain
When embarking on your journey to create stunning acrylic keychains, having the right tools is paramount. The right equipment not only paves the way for a successful DIY project but also enhances your crafting experience. Whether you’re a seasoned DIYer or just starting, equipping yourself with essential tools can make all the difference in achieving beautiful results.
To begin with, a laser cutter or CNC machine is ideal for those looking for precision. These devices can effortlessly cut intricate designs from acrylic sheets, ensuring clean, polished edges. If you don’t have access to these machines, a jigsaw or craft knife can work well for simpler shapes. Make sure to use a fine-toothed blade specifically designed for acrylic to minimize chipping. Pair these cutting tools with a straightedge or ruler for accuracy, especially when measuring and marking your designs.
Beyond cutting tools, don’t overlook the importance of safety equipment. A good pair of safety goggles and a dust mask will protect your eyes and lungs from acrylic particles generated during cutting. Additionally, a work surface that can withstand scratches and cuts, such as a self-healing mat, is essential for protecting your workspace and maintaining a neat area.
Finally, for the finishing touches, having the right adhesives and embellishments can elevate your keychain. Acrylic cement works wonders for bonding pieces together securely, while super glue or epoxy provides alternatives for more challenging materials. Moreover, consider keeping an array of decorative elements like beads, glitter, or paints on hand to add personal flair to your creations. With these essential tools ready at your disposal, you’re well on your way to crafting unique and beautiful acrylic keychains!
Step-by-Step Guide to Designing Your Keychain
When it comes to designing your acrylic keychain, the possibilities are as limitless as your creativity. Whether you’re leaning toward a minimalist style or aiming for something more elaborate, having a clear and structured step-by-step plan will ensure you create a piece that truly reflects your vision.
Start by sketching your design on paper. This gives you a tactile sense of proportion and layout. Consider the shape, text, and any additional decorative elements you might want to include. It may be helpful to use graph paper to maintain accurate proportions or to experiment with different color combinations and placements.
Once you have a finalized sketch, transition to using design software if you’re comfortable with digital tools. Programs like Adobe Illustrator or free alternatives like Inkscape allow for precise measurements and can help you visualize your design in actual size. Convert your sketch into a digital format, ensuring the lines are clean and clear for cutting. If you plan to cut intricate designs, remember to create vector paths for best results.
After designing, you’ll need to choose the right acrylic color and thickness for your keychain. Clear acrylic can give a sleek and modern feel, while colored options can add vibrancy to your creation. Keep in mind that different thicknesses will affect how sturdy your keychain feels, so opt for a thickness that balances durability with your design’s intricacies. Once your design is prepared and agreed upon, it’s ready for the cutting process, where your vision will come to life.
Top Techniques for Cutting Acrylic Safely
When it comes to crafting your own acrylic keychains, cutting the material safely and effectively is crucial for achieving a polished and professional appearance. Understanding the right tools and techniques not only enhances your creative process but also ensures that you can handle the material without injury. Acrylic can break or shatter if mishandled, so here are some valuable techniques to keep your crafting safe and enjoyable.
First, choose the appropriate cutting tool based on the complexity of your design. For simple shapes, a precision knife or utility knife can work well. Make sure to use a straight edge or a ruler to guide your cuts and maintain straight lines. For more intricate designs, consider using a laser cutter if you have access to one, as it provides clean edges without putting much pressure on the acrylic. Regardless of the tool you choose, always work on a stable surface and use a cutting mat to protect both your workspace and the blade.
Another essential technique involves scoring the acrylic before making heavy cuts. To do this, lightly drag your utility knife along your design lines to create a shallow cut. This score line will guide your deeper cuts and help prevent chips or cracks. If you need to cut thick acrylic sheets, using a saw specifically designed for plastics, such as a jigsaw with a fine-toothed blade, can offer better outcomes. Always ensure your workpiece is securely clamped to avoid movement during cutting, which can lead to mistakes or injuries.
Safety should be your top priority. Always wear safety goggles to protect your eyes from acrylic shards, and consider wearing gloves to minimize the risk of cuts. It’s also wise to work in a well-ventilated area, particularly when using power tools, to avoid breathing in any dust or fumes. Finally, take your time and don’t rush the cutting process; precision is key to achieving the desired result while maintaining safety.
By following these techniques, you can confidently cut acrylic for your keychain projects, ensuring that your creativity and safety go hand in hand. Remember, the more comfortable you become with your tools and methods, the more intricate and beautiful your keychain designs can be!
Decorating Your Acrylic Keychain: Creative Ideas
Acrylic keychains offer a versatile canvas for creativity, allowing you to express your personal style or that of someone special. From simple designs to intricate embellishments, there’s a myriad of ways to decorate your creations and make them truly unique. Consider starting with basic painting techniques or incorporating fun, colorful stickers-these methods are not only easy but also lend a playful touch to your keychains. For those seeking a more refined aesthetic, you might explore using alcohol inks or resin to create stunning marbled effects that catch the light beautifully.
To elevate your design game, think about layering elements. Use multiple colors of acrylic or even different materials like wood or metal to add dimension. You can also integrate charms, beads, or even small photos encased within the acrylic-a personal touch that transforms a simple keychain into a cherished keepsake. For a more whimsical approach, why not try rhinestones or sequins? These glitzy additions can turn an ordinary keychain into a sparkling accessory that stands out.
If you’re feeling adventurous, consider applying heat transfer vinyl (HTV) with your favorite quotes or images. This technique not only provides customization possibilities but also allows for a smooth, professional finish. To protect your designs from scratches, applying a clear sealant or an epoxy resin can be both functional and aesthetically pleasing, resulting in a glossy look that enhances the keychain’s overall durability.
Finally, don’t forget about the impact of thoughtful color schemes and themes. Whether you choose bright, cheerful shades for a fun vibe, or muted, sophisticated hues for a more elegant feel, your color choices will guide the style and appeal of your keychain. Remember, each keychain tells a story, and your creative choices will bring that narrative to life. So gather your supplies, let your imagination run wild, and enjoy the process of decorating your acrylic keychains!
Applying Adhesives and Finishes: Best Practices
When it comes to creating beautiful acrylic keychains, the right adhesive and finishing touches can elevate your project from basic to stunning. Understanding the properties of various adhesives is essential for achieving durable bonds and ensuring your keychain withstands daily wear. If you’re working with acrylic, opt for solvent-based adhesives designed specifically for plastics. These adhesives penetrate the acrylic surface, forming a strong bond without damaging the material. For attaching embellishments like beads, charms, or decorative elements, a clear resin or epoxy works wonders, providing both strength and a glossy finish.
Choosing the Right Adhesives
There are several adhesive options to consider, each catering to different project requirements:
- Super Glue: Ideal for quick adhesion. Use sparingly, as it can create a brittle bond.
- Plastic Cement: Perfect for bonding acrylic to acrylic, as it melts the plastic to create a strong bond.
- Epoxy Resin: Excellent for both structural and decorative purposes, providing a clear, durable finish.
Applying Finishes for a Professional Touch
Once your keychain is assembled, adding finishes can enhance its appearance and durability. Start by smoothing the edges with fine-grit sandpaper to create a polished look. After sanding, you can apply a coat of clear acrylic sealer or resin for protection against scratches and environmental damage. This not only enhances the visual appeal but also prolongs the life of your keychain. If you prefer a matte finish, look for matte spray sealers specifically designed for acrylic.
For added flair, consider using paints or decals designed for acrylic surfaces. Applying these finishers can allow for intricate designs, such as glitter options or even glow-in-the-dark paints, adding creativity and uniqueness to your keychains. Always follow the manufacturer’s instructions for application and curing times to achieve the best results.
Incorporating these techniques for adhesives and finishes will help ensure your acrylic keychains not only look fantastic but also stand up to the rigors of everyday use, making them cherished items-whether for personal use or as thoughtful gifts.
Tips for Personalizing Your Keychain
Creating an acrylic keychain offers a wonderful opportunity to express your personality and creativity. Personalizing your keychain not only makes it uniquely yours but also turns it into a thoughtful gift for someone special. Whether you’re crafting for yourself or as a present, there are countless ways to make your design stand out.
To begin, consider incorporating text or initials using various font styles. You can use a cutting machine like a Cricut to cut out vinyl letters that can easily adhere to the acrylic. Customize the message to tell a story-perhaps a quote that inspires you, a significant date, or the name of a loved one. Layering is another excellent technique; by stacking different colors or shapes of acrylic, you can create a dynamic three-dimensional effect that adds depth and interest to your keychain.
Don’t forget about decorative elements such as charms, tassels, or beads that can enhance the visual appeal. Incorporating materials like faux leather or fabrics can provide texture and contrast, making your keychain even more captivating. For example, a little pom-pom or a jangly charm can turn a simple design into a playful accessory that draws attention.
Lastly, applying finishes with a personal touch can take your creation to the next level. Consider adding glitter or using glow-in-the-dark paint for a whimsical vibe. Not only do these elements catch the eye, but they also showcase your artistic flair. Remember, the goal is to create something that resonates with you or speaks to the recipient’s tastes. Personalization is about making your creation a true reflection of your or your loved one’s style.
Troubleshooting Common DIY Acrylic Keychain Issues
Creating your own acrylic keychain can be a delightful endeavor, but it’s not without its challenges. Whether you’re a seasoned crafter or just starting, knowing how to troubleshoot common issues can save you time and frustration as you bring your creative vision to life.
One common issue is scratches on the acrylic surface. This can occur during cutting or handling. To prevent scratches, always place a protective covering on the work surface and handle the pieces carefully. If scratches do occur, you can often buff them out using a soft cloth and a small amount of acrylic cleaner. In more severe cases, consider using fine-grit sandpaper (2000-grit or finer) to gently sand the area, being careful not to overdo it and dull the surface.
Another frequent hurdle is misalignment during assembly. If your keychain features multiple components, such as layers or attached charms, ensuring they align correctly can be tricky. A helpful tip is to use a light adhesive or tape before fully securing pieces. This allows for adjustments without permanent commitment. Additionally, marking guidelines on the acrylic with a pencil can help during the assembly process.
If you’re experiencing issues with adhesive not sticking properly, it’s essential to ensure you are using the right type of glue. Not all adhesives are suitable for acrylic; a strong, clear epoxy is often the best choice for a durable bond. When applying, ensure both surfaces are clean and free of dust. For larger pieces, consider applying weight or clamps to hold the pieces together while the adhesive sets.
Dealing with Bubbles and Imperfections
You might also encounter bubbles in resin pours if you decide to add a resin coat to your acrylic keychain for added depth. To minimize bubbles, pour the resin slowly and in a thin stream. Using a heat gun or torch lightly over the surface can help pop any bubbles that do form. Additionally, always mix your resin thoroughly to prevent inconsistencies that might lead to bubbling.
Lastly, maintaining a clean working environment is crucial. Dust and debris can not only scratch the acrylic but also affect finishes and adhesives. Regularly clean your workspace, and have dedicated storage for your materials to keep them in pristine condition. By knowing these common issues and how to address them, you can ensure a smoother crafting experience while creating beautiful and durable acrylic keychains.
Sourcing Materials for Your Acrylic Keychain Projects
Sourcing high-quality materials for your acrylic keychain projects is crucial for achieving the best results. The right materials not only enhance the aesthetic of your keychains but also ensure their durability and functionality. Here’s a guide to help you gather everything you need for a successful DIY keychain.
Start with acrylic sheets. You’ll want options that are easy to cut and come in a variety of colors and thicknesses. Clear acrylic is popular for its versatility and elegance, while colored options offer unique design possibilities. Depending on the method you plan to use (laser cutting or manual cutting), make sure the thickness matches your project requirements, typically ranging from 1/8″ to 1/4″. You can find acrylic sheets at local craft stores or online retailers like Amazon or specialty plastics suppliers.
Next, look for adhesives and finishes. While strong, clear epoxy glue is the preferred choice for bonding acrylic, it’s also beneficial to have a versatile craft adhesive on hand for different aspects of your design. If you plan to add embellishments or protective coatings, consider acrylic sealers or sprays that enhance the finish of your project while adding durability.
Don’t forget about accessories that will complete your keychain. Items like key rings, clips, and tassels can often be found at craft supply stores or online. Look for kits that package these together for convenience. You might also want to explore decorative items like stickers or decals that can personalize your keychain further, adding flair and uniqueness.
Lastly, having the right tools is essential. A good quality cutting tool-such as a craft knife or laser cutter-will allow you to achieve precise shapes and designs. A drill for creating holes, sandpaper for smoothing edges, and perhaps a heat gun for any adjustments can enhance your crafting experience. Many of these supplies can be purchased as part of a kit or individually from various craft and hardware stores.
By sourcing quality materials and tools, you’ll set the foundation for crafting stunning acrylic keychains that reflect your personal style and creativity. Happy crafting!
Exploring Advanced Techniques: Glow-in-the-Dark and More
Creating custom keychains can be a wonderfully creative endeavor, especially when you incorporate advanced techniques that allow your pieces to stand out. One of the most captivating options is using glow-in-the-dark materials. This technique not only adds a whimsical touch but can make your keychains functional-especially in low-light environments like car keys or night bags.
To achieve this effect, you have a couple of options. First, consider using glow-in-the-dark acrylic sheets that can be found at specialty craft stores. These sheets come pre-colored with luminous materials and can be cut just like regular acrylic. When designing your keychain, think about shapes that will enhance the glow effect; for instance, creating star or moon shapes can add a playful element to the finished product. Ensure you expose the acrylic to light (natural sunlight or UV light) before using it; this will charge the glow property, allowing it to shine brightly when the lights go out.
In addition to glow-in-the-dark techniques, you might explore other surface treatments and finishes that can elevate your designs. For instance, you can experiment with transparent paints or coatings that add shimmer or gloss. Adding a layer of resin can also amp up the visual appeal, providing a glass-like finish that protects your design and enhances the colors beneath.
Using advanced techniques can transform a simple DIY project into a striking accessory or gift. Don’t hesitate to mix and match these ideas-perhaps a glow-in-the-dark base with a glossy finish or integrating metallic accents into your acrylic designs. The possibilities are endless, inspiring you to create pieces that are as unique as they are functional. Experiment and have fun with your designs, tapping into your creativity to craft items that reflect your personal style while also ensuring they make an impression!
Ideas for Selling Your DIY Acrylic Keychains
Selling DIY acrylic keychains can be a lucrative and rewarding venture, especially in today’s market where personalization and unique accessories are highly sought after. Whether you aim to sell at local craft fairs, online platforms, or through social media, there are several strategies to effectively market your creations and attract buyers.
To begin with, showcasing your products visually is key. High-quality photos with good lighting can make a world of difference. Use different angles and close-ups to highlight intricate designs and finishes. Creating lifestyle images-showing the keychains in use, perhaps attached to bags or key rings-can help potential buyers envision them in their own lives. Additionally, consider creating compelling descriptions that tell the story behind each piece, emphasizing the craftsmanship and the inspiration behind the design.
Another effective strategy is to tap into your audience’s interests by creating themed collections or seasonal designs. For instance, you could produce holiday-themed keychains or create collections based on popular trends, hobbies, or fandoms. Engaging with your audience through social media can also provide insights into what they love, allowing you to tailor your offerings accordingly.
Marketplaces and Platforms
When it comes to selling your keychains, numerous platforms can help you reach a broader audience:
- Etsy: A marketplace dedicated to handmade and unique items, making it perfect for your crafts.
- Instagram: Utilize visually-driven posts and stories to showcase your work, running promotions or hosting giveaways to engage your followers.
- Local Craft Fairs: Participate in events where you can meet customers directly, allowing them to see and hold your products.
- Online Store: Consider setting up your own website to market your brand and keep full control over your sales.
Customer Engagement and Personalization
Finally, consider offering a customization option for your keychains. Personalization is a strong selling point; allow customers to add their names, favorite colors, or specific shapes. This not only enhances the product’s value but also strengthens the bond with your customers as they receive a unique piece tailored just for them.
Don’t underestimate the power of customer feedback and reviews. Encourage buyers to share their experiences and tag you in their posts. This can help build social proof, which is crucial for attracting new customers.
Embrace your creativity and entrepreneurial spirit; selling DIY acrylic keychains can be a fulfilling way to showcase your artistic talents while generating an exciting income stream. Experiment with your marketing strategies, stay connected with your audience, and watch your small business flourish!
Maintaining and Caring for Your Acrylic Keychains
Caring for your acrylic keychains doesn’t just prolong their life; it keeps them looking vibrant and attractive. Acrylic is a durable material, but like any accessory, it requires proper maintenance to resist scratches, fading, or damage. To ensure your keychains remain a delightful accessory or a successful product for sale, it’s essential to follow a few straightforward maintenance tips.
First and foremost, regular cleaning is crucial. Use a soft microfiber cloth to gently wipe the surface of your acrylic keychain, avoiding any rough materials that might scratch the finish. For deeper cleaning, a mixture of mild soap and lukewarm water is effective. Dip the cloth in the soapy solution, wring it out well, and gently clean the surface. Rinse with a damp cloth to remove any soap residue, then dry it with a soft towel. Make sure to avoid using ammonia-based cleaners or any abrasive substances, as they can dull the acrylic’s shine.
When storing your acrylic creations, keep them away from direct sunlight and extreme temperatures to prevent discoloration or warping. Ideally, store your keychains in a padded pouch or a soft-lined box. If you showcase your keychains-as you might if you’re selling them at markets or online-consider a protective display case that allows visibility while shielding them from dust and damage.
Additionally, if your keychains have any embellishments, such as glitter or stickers, it’s wise to inspect these periodically. Ensure they remain intact and consider reapplying adhesive if they begin to peel. Remember that personalization and custom designs enhance the charm of your keychains but may also require extra care to maintain their intricate details.
In summary, by implementing simple cleaning routines and proper storage practices, you can significantly extend the lifespan of your acrylic keychains, ensuring they remain eye-catching and functional for years to come. Embrace these tips as part of your crafting journey, not just as care instructions, but as a way to celebrate the beauty of your DIY projects.
Faq
Q: What materials do I need to make an acrylic keychain?
A: To create an acrylic keychain, you’ll need acrylic sheets, a cutting tool (like a laser cutter or craft knife), keychain hardware (such as rings and clasps), and decorative materials (like paint or stickers). Check the “Sourcing Materials for Your Acrylic Keychain Projects” section for detailed recommendations.
Q: How can I personalize my acrylic keychain?
A: Personalizing your acrylic keychain can be done through engraving, painting, or adding charms. Consider using permanent markers, acrylic paint, or adhesive vinyl to customize your design. Explore the “Tips for Personalizing Your Keychain” section for more inventive ideas.
Q: What techniques are best for cutting acrylic safely?
A: Safe cutting techniques for acrylic include using a laser cutter for precision or a fine-toothed saw for thicker sheets. Always wear protective eyewear and work in a well-ventilated space. Refer to the “Top Techniques for Cutting Acrylic Safely” section for comprehensive safety tips.
Q: How do I finish my acrylic keychain after crafting?
A: To finish your acrylic keychain, sand the edges for a smooth appearance and apply an acrylic sealant for protection. This will help prevent scratches and maintain the shine. Learn more in the “Applying Adhesives and Finishes: Best Practices” section.
Q: Can I use a regular printer to print designs for my acrylic keychain?
A: Yes, you can use a regular printer to print designs on special transfer paper, which can then be applied to your acrylic. Ensure you use waterproof ink to prevent damage. Check out “Step-by-Step Guide to Designing Your Keychain” for more insights.
Q: What common problems should I look out for when making acrylic keychains?
A: Common issues include cracking the acrylic while cutting, poor adhesion of decorative elements, or misalignment of designs. The “Troubleshooting Common DIY Acrylic Keychain Issues” section offers valuable solutions to these problems.
Q: How can I make glow-in-the-dark acrylic keychains?
A: To create glow-in-the-dark acrylic keychains, use acrylic paint or resin that contains phosphorescent pigments. After applying, expose the keychain to light for a few minutes to activate the glow. More advanced techniques can be found in the “Exploring Advanced Techniques: Glow-in-the-Dark and More” section.
Q: What are some ideas for selling my DIY acrylic keychains?
A: To sell your acrylic keychains, consider setting up an online shop, using social media for promotion, or participating in craft fairs. Highlight unique designs and offer customization options. The “Ideas for Selling Your DIY Acrylic Keychains” section has further strategies to boost your sales.
Final Thoughts
Congratulations on completing your acrylic keychain! You now have a unique accessory that showcases your creativity and personalization skills. If you enjoyed this tutorial, dive deeper into our other DIY guides, such as “Creative Jewelry Storage Solutions” and “How to Clean and Care for Your Acrylic Pieces” to enhance your crafting journey. Don’t forget to share your keychain creations with us in the comments below-we love seeing your unique designs!
Ready to take your DIY skills to the next level? Sign up for our newsletter for exclusive tips, tricks, and updates on all things craft-related! The world of DIY is full of endless possibilities, so gather your materials and start exploring new projects today. Your next masterpiece is just a craft session away!