Cutting Perspex acrylic sheet may seem daunting, but with the right techniques, you can achieve perfect results every time. This versatile material, known for its clarity and durability, is widely used in crafting, displays, and even jewellery-making. Whether you’re a DIY enthusiast or an experienced creator, understanding how to properly cut Perspex can elevate your projects to a professional level.
One common concern is achieving clean edges without cracking or chipping the material. This guide will walk you through essential tips and tools that will empower you to confidently manipulate this thermoplastic, ensuring your designs are not only beautiful but also structurally sound. Discover the strategies that can transform your approach to acrylic, turning your ideas into stunning creations. Let’s dive in and unlock the secrets to mastering Perspex cutting!
Choosing the Right Tools for Cutting Acrylic
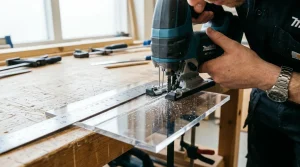
When embarking on a project to cut Perspex acrylic sheets, the tools you choose can significantly impact the quality and precision of your cuts. The right tools not only make the process smoother but also ensure safety and enjoyment. Start with a high-quality utility knife for thinner sheets (up to 3mm), as it allows for easy scoring and snapping. For thicker materials, investing in a circular saw fitted with a fine-toothed blade can provide the clean cuts you desire. Remember, the blade type is crucial; a blade specifically designed for acrylic will minimize chipping and ensure a polished finish.
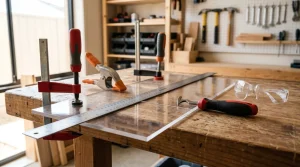
In addition to cutting tools, consider your workspace setup. A flat, stable surface will support the sheet and help prevent vibrations that can lead to uneven cuts. To enhance accuracy, a straight edge or guide is essential for maintaining a precise cutting line. You can create one with a scrap piece of wood or a metal ruler, securing it with clamps so it won’t shift during cutting. This setup not only leads to cleaner edges but also improves your control over the cutting process.
Finally, don’t overlook safety equipment. Wearing safety glasses will protect your eyes from any flying debris, and gloves can prevent accidental cuts to your hands. With the right tools and precautions in place, you’ll be well-equipped to tackle your acrylic projects confidently, leading to beautiful, successful outcomes every time.
Essential Safety Precautions When Cutting Perspex
When it comes to cutting Perspex acrylic, safety should be your top priority. The process may seem straightforward, but neglecting basic safety precautions can lead to accidents and injuries. One notable risk is that acrylic sheets can produce sharp shards and splinters when being cut, which can easily cause cuts or eye injuries. To prevent accidents, hey, it’s essential to equip yourself with proper safety gear and follow established protocols.
Start by wearing personal protective equipment (PPE). Safety goggles are a must to protect your eyes from flying debris, while durable gloves can shield your hands from sharp edges and microscopic debris. Additionally, consider using a dust mask if you’re working with power tools that may generate fine acrylic dust, which can irritate your lungs. An apron or protective clothing can also prevent any accidental scratches or cuts from sharp materials.
Environmental considerations are just as important. Ensure your workspace is well-lit and organized to minimize distractions. Use a sturdy workbench that can support your acrylic sheet securely, preventing it from slipping or collapsing during the cut. Clamping the material in place can provide extra stability and prevent accidents. Lastly, maintain a clear area around your workspace to avoid tripping hazards-this can be especially important when using power tools or heavy equipment.
By prioritizing safety and adhering to these essential precautions, you can embark on your acrylic cutting project with greater confidence, ensuring a smooth, injury-free experience as you create beautiful pieces.
Step-by-Step Guide to Making Perfect Cuts
To achieve perfect cuts when working with Perspex acrylic, understanding the right techniques and processes is essential. Acrylic, while versatile and visually appealing, requires careful handling to ensure clean, precise edges. Whether you’re crafting display cases, signage, or jewelry pieces, following a systematic approach will yield superior results and help you avoid common pitfalls.
Start by selecting the appropriate cutting tool based on the thickness and size of your acrylic sheet. For thinner sheets (up to 3mm), a utility knife can be effective. Score the acrylic along your cutting line using a straight edge, applying consistent pressure until you’ve made a deep enough groove. Once scored, simply snap the sheet along the line, exerting gentle pressure on both sides. For thicker sheets, a jigsaw or circular saw equipped with a fine-toothed blade is recommended. Set the blade to a slow speed to minimize friction and potential melting. Ensure that your saw blade is specifically designed for cutting plastic to achieve the best results.
Preparation is Key
Before you make your cuts, it’s crucial to prepare your workspace and materials. Here’s a concise list of steps to follow:
- Measure and mark your acrylic sheet accurately using a fine-tip marker.
- Secure the acrylic to a stable work surface, using clamps to prevent movement during cutting.
- Double-check your measurements and markings before proceeding to cut.
Taking the time to ensure everything is in place will significantly improve the accuracy of your cuts.
Making the Cut
Once you’re set, it’s time to cut. For optimal results, maintain a steady hand and don’t rush the process. If using a power tool, allow the blade to do the work and avoid forcing it through the material. For manual cuts with a utility knife, make multiple shallow passes if necessary, rather than attempting to cut through in one go. This technique not only ensures greater control but also results in a cleaner edge.
After completing the cut, inspect the edges. If any rough spots or burrs remain, carefully sand these down using fine-grit sandpaper. This will not only improve the appearance but also ensure safety from sharp edges. Following these steps will help achieve the precision needed for professional-looking acrylic projects.
Techniques for Different Acrylic Sheet Thicknesses
To achieve precise cuts with Perspex acrylic, understanding the varying techniques for different thicknesses is paramount. Thinner sheets (up to 3mm) are relatively easy to work with and can often be cut using simple hand tools. For these sheets, a utility knife is ideal. Start by scoring the acrylic along your desired line using a straight edge. It’s essential to apply consistent pressure-this creates a deep groove, making it easier to snap the sheet along the line. Once you’ve made a few passes, gently bend the sheet at the score line to break it cleanly.
As the thickness increases (3mm to 6mm), your approach needs to adapt. A jigsaw fitted with a fine-toothed blade is recommended for clean cuts on these medium-thickness sheets. When using a jigsaw, set the speed to slow to reduce friction, which can lead to melting or chipping. It’s also beneficial to place a sacrificial board beneath the acrylic to minimize chipping on the underside as you make your cuts. Ensure the jigsaw blade is specifically designed for cutting plastic, as this will enable you to maintain a smoother edge.
For thicker acrylic sheets (greater than 6mm), a circular saw becomes necessary. Use a blade with a higher tooth count for finer cuts, and remember to keep the blade at a low speed. This will not only provide cleaner edges but also help prevent the material from overheating and melting. As with the other thicknesses, secure the acrylic properly to ensure stability during cutting, and remember to prioritize safety: wearing goggles and a mask will protect you from any fine plastic dust created during the process.
Ultimately, knowing which tools and techniques are best suited for each thickness will empower you to cut Perspex acrylic confidently and accurately, allowing for professional-grade results in your projects.
Using a Straight Edge for Accurate Cuts
When it comes to achieving flawless cuts in Perspex acrylic, using a straight edge is a game changer. This simple tool can make the difference between professional-looking results and uneven edges that can compromise the quality of your project. A straight edge, such as a metal ruler or a carpenter’s square, provides a solid reference point, ensuring that your cuts remain true to the line without slipping or shifting.
To effectively score your acrylic sheet, position the straight edge along your intended cut line, ensuring it is firmly in place. It’s essential to use a utility knife for thinner sheets (up to 3mm) and apply consistent pressure as you glide the blade along the edge. Scoring should be done multiple times, making sure each pass deepens the groove to facilitate a clean snap. Once you’ve created a sufficient score line, gently bend the acrylic at the mark to break it cleanly along the line.
For thicker sheets, while a straight edge is still crucial, you may need to incorporate other cutting tools like a jigsaw or circular saw. In this case, the straight edge can help guide your saw for straight cuts. Align the edge of your cut with the straight edge and secure both the straight edge and the acrylic sheet firmly to prevent any movement during cutting. Utilizing clamps to hold your materials in place is an added measure that contributes to precision and enhances safety.
In summary, the versatility of a straight edge extends beyond just marking lines; it is integral to achieving accuracy and stability throughout your cutting process. By leveraging this simple tool, you can enhance your cutting technique, ensuring that every piece of Perspex acrylic you work with is cut to perfection, ready for your creative projects.
Best Practices for Polishing Cut Edges
Properly polishing cut edges of Perspex acrylic can elevate your project from good to exceptional, creating a finish that’s smooth, professional, and aesthetically pleasing. The clarity of acrylic is one of its defining features, but rough edges can muddle that brilliance. To achieve the perfect edge, begin by gathering the right tools, including fine-grit sandpaper, a polishing compound, and a soft cloth.
Start by gently sanding the edges of the acrylic with fine-grit (around 400 to 600) sandpaper. Sand in a circular motion for uniformity, ensuring that you apply light pressure to avoid scratching the surface. After achieving a smooth edge, progress to an ultra-fine sandpaper (around 1200 to 2000 grit) to further refine the edge. This step is crucial as it prepares the surface for polishing, removing any micro-scratches from the initial sanding.
Once the surface is adequately prepared, it’s time to polish. Apply a small amount of polishing compound to a clean, soft cloth, and rub it onto the edges in a circular motion. This will restore the acrylic’s shine and enhance its clarity. For larger projects, you might want to use a buffing wheel, but ensure it’s set to a low speed to prevent overheating, which can warp the acrylic.
A final rinse with warm water can help remove any residual polishing compound. If you notice any imperfections post-polishing, don’t hesitate to repeat the process, as achieving a flawless finish often requires patience and multiple passes. By mastering the art of polishing, you not only improve the aesthetics of your acrylic projects but also enhance their durability, ensuring they stand the test of time.
Troubleshooting Common Cutting Issues

Cutting acrylic can sometimes feel like an art form, yet many encounter common pitfalls that can lead to frustration. The good news is that with the right knowledge and strategies, you can easily troubleshoot and overcome these challenges. One of the most prevalent issues is chipping along the cut edges, particularly when using a saw blade that isn’t suited for acrylic. To resolve this, ensure you’re using a fine-toothed blade specifically designed for plastic. Additionally, implementing tape along the cut line can help protect the surface and reduce chipping.
Another frequent issue is melting edges, which occurs when the cutting tool generates too much heat. This can happen if you’re cutting too quickly or applying too much pressure. To mitigate this, slow down your cutting speed and let the tool do the work. If you notice melting despite these adjustments, consider using a lubricant, such as soapy water, to cool the material as you cut.
Alignment issues can lead to uneven cuts, which not only detracts from the aesthetics but can also compromise the fit of your pieces. Always double-check that your cutting tool is well-aligned and secure before you start. Using a straight edge for guidance is essential; a straight edge will ensure the accuracy of your cuts. If you find alignment continually problematic, using clamps to secure your acrylic sheet can provide additional stability and support.
Finally, rough edges can dull the appearance of your project. If you’ve cut and the edges don’t meet your expectations, don’t fret! You can smooth them by sanding or using a flame polish technique. This involves gently passing a flame over the rough edges to meld and smooth the surface-just be cautious to avoid overheating. Remember, experience is key, and with practice, your cutting skills will only improve, leading to perfect cuts every time.
Alternative Methods for Cutting Acrylic Sheets
Cutting acrylic sheets doesn’t have to be limited to traditional saws or knives-there are several alternative methods that can yield precise and clean edges. Understanding these techniques can greatly enhance your project, whether it’s for crafting, home decor, or bespoke jewelry displays. Here are three effective methods to consider:
Score and Snap Method
The score and snap method is one of the simplest and most efficient ways to cut thin acrylic sheets (typically up to about 1/4 inch thick). It involves using a utility knife to score a straight line across the acrylic. Here’s how you can do it:
- Tools Required: A straight edge, a utility knife, and a stable surface.
- Process: Place the acrylic sheet on a flat surface. Use the straight edge as a guide and firmly run the utility knife along the edge to score the surface. Make several passes-three to four is usually sufficient-applying consistent pressure.
- Snap: Once you have a deep score line, align the scored line over the edge of your table and apply downward pressure on the outer side of the cut. If scored properly, the acrylic should snap cleanly at the score line.
Laser Cutting
For precision and intricate designs, laser cutting is a fantastic alternative. This method employs a focused beam of light to cut through acrylic with exceptional accuracy. While it may require access to specialized equipment, the results are often worth it, especially for detailed work.
- Advantages: Laser cutting ensures smooth edges and can handle complex shapes without the risk of chipping or cracking.
- Considerations: You’ll need access to a laser cutter, which may be available at local maker spaces or through online cutting services if you lack the tools.
Hot Knife Cutting
Using a hot knife is another viable method for cutting acrylic, especially for thicker sheets. The heat melts through the material rather than cutting it, which can reduce the chance of chipping.
- Process: Preheat a hot knife and slowly guide it along your cut line. This will melt the acrylic, creating a seamless edge as it cools.
- Tip: Ensure that you work in a well-ventilated area, as melting acrylic can release fumes.
Incorporating these alternative methods can diversify your acrylic cutting toolkit, allowing for greater creativity and precision in your projects. Each technique has its unique benefits, making it important to choose one that aligns with your specific needs and the thickness of the acrylic sheet you’re working with.
Creative Projects Using Cut Perspex Acrylic

Cutting Perspex acrylic opens up an exciting realm of creative possibilities, allowing you to transform simple sheets into unique and stunning projects. Whether you’re crafting bespoke jewelry pieces, designing home decor items, or creating innovative display stands, the versatility of acrylic can elevate your artistic endeavors. With a bit of imagination and the right techniques, the potential for beautiful creations is virtually limitless.
One popular project among DIY enthusiasts is creating custom jewelry. With its ability to be cut into intricate shapes, Perspex can be transformed into earrings, pendants, or statement necklaces. Using methods like the score and snap for thinner sheets or laser cutting for more intricate designs, you can achieve precise and clean edges, giving your jewelry a polished professional look. Consider experimenting with layering colored acrylic pieces to add depth and dimension to your creations.
Additionally, home decor items made from acrylic can brighten up any space. Think about crafting unique wall art or personalized photo frames. Utilizing vibrant colored sheets and shapes cut to your liking allows for specific designs that complement your decor style. Acrylic can also be used to make functional items, such as floating shelves or table centerpieces, which not only add flair but also showcase your artistic talent.
For those looking to display items in creative ways, acrylic makes a fantastic choice due to its transparency and strength. Crafting display stands for perfumes, collectibles, or jewelry can be both fun and rewarding. Clear acrylic allows items to appear as if they are floating, drawing attention to the displayed pieces without overwhelming the overall aesthetic.
Remember, the key to a successful project lies in the details. After cutting your acrylic sheets, don’t overlook the importance of finishing touches, such as polishing the edges for a sleek look. Proper care in both the cutting and assembly stages will ensure your Perspex creations are not only beautiful but also durable. Embrace the experimental process, and you’ll discover endless ways to express your creativity through cut acrylic.
Maintaining Your Tools for Longevity
Maintaining your tools is crucial for achieving perfect cuts every time when working with Perspex acrylic. Just as a well-maintained set of jewelry-making tools enhances your artistic expression, properly cared-for cutting tools ensure precise and clean edges, minimizing the risk of damaging your sheets. Here’s how you can keep your tools in top shape, enabling you to create stunning acrylic projects effortlessly.
One of the primary tools for cutting acrylic is the utility knife or a specialized acrylic cutter. To maintain these, make sure to regularly check the blades for dullness. Dull blades will not only result in jagged edges but can also lead to unnecessary frustration during your crafting process. Replace or sharpen blades whenever you notice a decrease in performance. Additionally, keep your cutting surface clean and free of debris, as any leftover particles can affect the quality of your cuts.
It’s also essential to store your tools properly. A dedicated toolbox or a pegboard can help organize your cutters, straight edges, and other implements, preventing damage and ensuring they’re easily accessible when you’re ready to craft. Consider using blade guards or protective cases to shield sharp implements from potential accidents or wear. Keeping tools labeled and in order can save time and help establish a more enjoyable work environment.
Lastly, regular cleaning will prolong the lifespan of your tools. Use a soft cloth to wipe down blades and surfaces after each use, removing any residue from the acrylic. For more stubborn build-up, a gentle solution of soap and water can be effective. Avoid harsh chemicals that might corrode your tools or interfere with the integrity of your cuts. By following these maintenance tips, you’ll not only ensure accuracy in your cutting but also enjoy a smoother and more rewarding crafting experience.
Understanding Different Types of Acrylic
Acrylic comes in various types, each suited for different applications and methods of cutting. Understanding these types is crucial for achieving clean, precise cuts, which ultimately enhance the quality of your projects. The most common varieties include cast acrylic, extruded acrylic, and specialty acrylic sheets, each possessing unique characteristics that affect their processing.
Cast Acrylic
Cast acrylic is known for its exceptional clarity and optical quality, making it a preferred choice for applications such as displays and signage. It is produced by pouring a liquid monomer into a mold, allowing for a thicker and more robust sheet. When cutting cast acrylic, you typically achieve smoother edges, and it can withstand heavy machining processes. However, it requires sharp blades or specialized tools to prevent chipping during cutting.
Extruded Acrylic
In contrast, extruded acrylic is formed by forcing the acrylic mixture through a die, resulting in lower costs and improved availability. While less durable than its cast counterpart, extruded acrylic is easier to cut due to its consistent thickness and flexibility. It’s often used in home projects and simpler applications like picture frames. Be mindful that extruded acrylic can melt more easily when subjected to heat during cutting, so a slower cutting speed is recommended.
Specialty Acrylic Sheets
There are also specialty acrylic sheets, which include options like frosted, colored, or UV-resistant acrylic. Choosing the right type for your project is essential since these variations can influence both the cutting method and the final appearance of your work. For example, frosted acrylic provides a diffused light effect, perfect for displays, but requires careful cutting to maintain its aesthetic quality. Meanwhile, UV-resistant acrylic ensures longevity in outdoor settings, making it ideal for signage exposed to sunlight.
By familiarizing yourself with these various acrylic types, you can make informed decisions that enhance your cutting technique and overall project outcome. Whether you’re crafting signs, displays, or decorative pieces, understanding your material is the first step toward achieving professional-quality results.
Cost-Saving Tips for DIY Acrylic Projects
Maximizing your budget while working with acrylic can lead to innovative and impressive projects without breaking the bank. One savvy approach is to plan your cuts meticulously to minimize waste. By carefully sketching out your project dimensions and arranging your cuts to fit within the same sheet, you ensure you’re using every inch of material efficiently. This not only saves money on raw materials but also reduces the clutter of leftover scraps, making your workspace tidier and your project smoother.
Buying in bulk is another effective strategy. Many suppliers offer significant discounts on larger quantities of acrylic sheets. If you foresee multiple projects, consider purchasing various thicknesses and types at once to take advantage of these savings. Additionally, collaborating with fellow DIY enthusiasts can amplify these benefits; split the order with friends or local crafters to access the best deals without excess material.
When it comes to tools, using what you already have can save on initial costs. Many common cutting tools, such as utility knives or jigsaws, can effectively handle acrylic when fitted with the right blade. Look for blades specifically designed for plastic; these are often more affordable than purpose-built acrylic saws. Regular tool maintenance is crucial here-keeping blades sharp extends their life and ensures cleaner cuts, reducing the need for costly replacements.
Lastly, explore creative uses for scrap pieces. Even the small remnants from your projects can be transformed into unique pieces of decor or smaller craft projects. For example, small scraps can be converted into jewelry, coasters, or mini display cases. Embracing the concept of “waste not, want not” not only cultivates creativity but also enhances the overall value of your DIY endeavors. By incorporating these cost-saving tips, you’ll empower yourself to embark on your acrylic crafts with confidence, knowing that you’re making savvy choices every step of the way.
FAQ
Q: What is the best tool for cutting Perspex acrylic sheets?
A: The best tool for cutting Perspex acrylic sheets is a score-and-snap method with a sharp utility knife for thinner sheets, while a jigsaw or circular saw with fine-toothed blades is ideal for thicker sheets. Always ensure that the tool is suitable for acrylic to prevent chipping.
Q: How can I avoid chipping when cutting acrylic sheets?
A: To avoid chipping when cutting acrylic sheets, use a fine-toothed blade and make slow, steady cuts. Applying masking tape along the cut line can help protect the edge. Additionally, always ensure your cutting surface is stable to minimize vibrations during cutting.
Q: Is it safe to cut acrylic sheets indoors?
A: Yes, it is generally safe to cut acrylic sheets indoors if you ensure proper ventilation and wear safety goggles and a mask to protect against dust. This is particularly important when using power tools, as they can create fine particles that may be harmful if inhaled.
Q: Can I use a hot knife to cut acrylic?
A: Yes, a hot knife can be used to cut acrylic, especially for creating smooth edges. The heat melts the acrylic rather than cutting through it, which reduces chipping. Ensure to work in a well-ventilated area and use caution to avoid burns.
Q: How do I achieve smooth edges after cutting acrylic?
A: Achieve smooth edges after cutting acrylic by lightly sanding the cut edges with fine-grit sandpaper. You can also use a flame from a lighter or propane torch to gently melt the edges for a polished finish, but take care not to overheat the material.
Q: What are some common mistakes when cutting acrylic sheets?
A: Common mistakes when cutting acrylic sheets include using the wrong type of blade, cutting too quickly, and not securing the sheet properly. These can lead to uneven cuts or cracks. Always follow the guidelines for the specific tool and thickness of the acrylic.
Q: How thick of an acrylic sheet can I cut with a utility knife?
A: You can cut acrylic sheets up to about 3mm (1/8 inch) thick with a utility knife using the score-and-snap technique. For thicker sheets, switch to a saw specifically designed for cutting acrylic to ensure cleaner cuts without damage.
Q: What safety gear should I wear when cutting acrylic sheets?
A: When cutting acrylic sheets, wear safety goggles to protect your eyes from flying debris, a dust mask to avoid inhaling particles, and gloves to prevent cuts. Ensure your workspace is clean and free of obstructions to maintain safety.
These FAQs provide valuable insights and practical tips for cutting Perspex acrylic sheets safely and effectively, encouraging readers to refer back to the main article for more detailed guidance.
Concluding Remarks
Now that you’ve mastered the essentials of cutting Perspex acrylic sheets, it’s time to put your newfound skills into action! Remember, achieving perfect cuts every time not only enhances your projects but also opens up endless creative possibilities. Don’t hesitate-grab your tools and start crafting today!
For deeper insights, check out our guides on DIY Tips for Crafting with Acrylic and Essential Tools for Precision Cutting. If you have questions or want to share your experiences, drop a comment below; we love hearing from our creative community!
Before you go, consider subscribing to our newsletter for exclusive tips on jewellery care and styling advice that will keep you inspired on your journey. Empower yourself with knowledge, and let’s continue creating beautiful things together!
Expert Guide & Insights: How To Cut Perspex
When exploring how to cut perspex, consumers, collectors, and fashion enthusiasts frequently encounter conflicting advice regarding material composition, wearability, authenticity verification, and long-term maintenance. In this specialized guide section, we provide an expert breakdown of key considerations, care recommendations, and practical solutions.
| Key Consideration | Primary Mechanism / Feature | Recommended Action | Value / Durability Impact |
|---|---|---|---|
| Material Integrity & Alloys | Purity standards (925 silver, 14k/18k gold, titanium, acrylic polymers) | Check official hallmark stamps and certificates before purchase | ★★★★★ High durability & heirloom retention |
| Daily Wear & Environmental Factors | Exposure to moisture, sulfur, sweat, perfume, and abrasive friction | Remove accessories before swimming, heavy workouts, or applying cosmetics | ★★★★☆ Prevents tarnish, chipping, and fading |
| Long-Term Storage & Cleaning | Atmospheric oxidation and chemical exposure over time | Store in airtight zip pouches with silica desiccant; polish with soft cloth | ★★★★★ Restores original mirror luster |
Frequently Asked Questions: How To Cut Perspex
What should I know about how to cut perspex?
Detailed examination reveals that addressing how to cut perspex depends on proper handling, choosing hypoallergenic materials, and adhering to routine cleaning protocols.
How can I preserve the quality and appearance of my pieces?
Always store items individually to prevent scratch contact, avoid harsh chemical detergents or chlorine pools, and use specialized polishing cloths designed for precious metals and acrylics.
Get our latest guides, news, and insights highlighted in your Google Search & AI Overviews.